How to Switch Between User Accounts in Windows 8.1
Setting up different account types in your Windows 8.1 machine helps ensure that your files and all the other stuff that are saved in your computer’s hard drive are safe against unauthorized access. Windows 8.1 takes all of these concept to the next level by adding brand new account types that will enable you to share, sync and even assign some restrictions to an account especially that which you have set up for your child. In the older Windows editions such as Windows XP, Vista and Windows 7, users were only allowed one type of account to be set up which is what is called a “Local account” but in the new Windows 8.1 system, you can set up a Local account, a Microsoft account and a Child’s account. The differences in these account types and the steps in how you can switch between them are what we’re going to discuss in this tutorial so be sure to follow the steps that will be shown below so you can master this important aspect of every Windows 8.1 machine.
Microsoft, Local and Child’s Account, What’s the Difference?
If you’re going to set up different account types in your Windows 8.1 machine, you’ll first need to learn the differences between them so you can decide which one should you set up. Each type of account in Windows 8.1 have a special capability that will let you stay in control of all the stuff that’s going on in your computer. To learn the differences between the three account types in Windows 8.1, here’s a thorough description of what they are capable of doing and what features they offer which will hopefully match to your needs.
1. Microsoft Account
Windows 8.1 recommends that you set up a Microsoft account in your computer so you can enjoy all of the awesome features that are nowhere to be found in its predecessors. Think of a Microsoft account as your Google account that you use in your Android device. Yes! The new Windows operating system platform allows you to sign in with a Microsoft email so you can have your files, settings and other stuff synced to all your other Windows-based devices such as tablets, smartphones and other hybrids.

The account that is highlighted on the screenshot above shows an example of a Microsoft account. As you can see, it is automatically assigned as the computer’s administrator and you will be able to see the Microsoft email that was used to log in just below the account name. A Microsoft account does not only allow access to your local files but also enables every user to transfer them to their other devices by saving them in a safe location which is called “OneDrive”. More about this free cloud service by Microsoft will be discussed in one of our future tutorials.
2. Local Account
As was mentioned earlier in this tutorial, a Local account is what we’ve all used in previous Windows editions. This account type allows a user to access all available settings, locations and even files that are saved in a computer’s hard drive except of course if it is a “Guest account” which only has a limited access to files according to what the administrator allows to be shown to guest users and which ones are off limits. A Local account does not have the capability of syncing settings and other stuff to your other Windows devices but it is an ideal one to set up for Guest accounts in your Windows 8.1 machine.
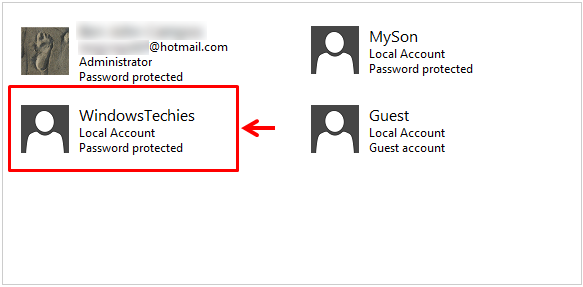
The account that is highlighted above shows an example of a Local account and as you can see, it does not bear an email address under the account name. If you want to access the section in your computer that displays all available accounts in your machine, all you need to do is access the Control Panel Window by pressing the Windows+X keys and on the box of links that appears at the bottom-left corner of the screen, simply click on the one that says “Control Panel”.

Once the Control Panel Window opens, simply click on the “User Accounts and Family Safety” link and on the Window that follows, click again on “User Accounts” then “Manage another account” as shown on the screenshot below. After doing this, you will arrive at the screen where you will be able to see all the other user accounts that are registered in your machine.

3. Child’s Account
Lastly, the third type of account that you can create in your Windows 8.1 machine is one that will help you to implement some restrictions and rules in PC usage and even website access. You can create a Child’s account just like setting up a local account or with a Microsoft email. If you choose to create your child’s account without a Microsoft email, you can set up time limits and website restrictions to it but you can monitor PC usage online. If you want to activate this feature, you’ll need to create the Child’s account with a Microsoft email.
Microsoft has intentionally included a child’s account as one of the account types that can be created in every Windows 8.1 machine so parents can have good grips with what their child is doing, when they can access the Internet and what websites will they be allowed to access. The steps in creating a child’s account will be discussed in greater detail in our next tutorial so be sure to watch out for it so you can master everything that is involved along the process.
Switching Between User Accounts
Now that you learned how one account type differs from the other, you can now create your desired account on your Windows 8.1 machine and after doing so, you can start exploring the features that are available in these accounts. Once you are done setting up the accounts that you want to set up in your machine, you will need to learn how you can switch between these accounts so you can open them instantly. To do this, you will first need to lock your computer by pressing on the Windows+L keys on your machine’s keyboard. After doing so, you will see the “Lock Screen” image on the screen and from here, you can either swipe upwards or simply click on the screen to access the sign in page as shown on the screenshot below.
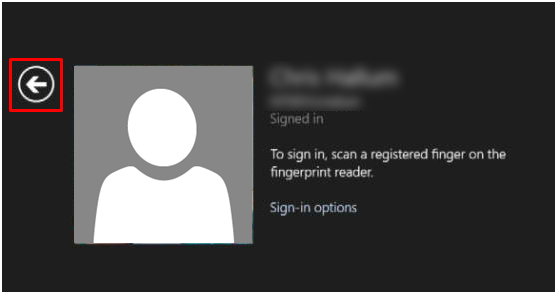
From here, you will see a link that says “Sign-in options”. If you click on it, some icons will appear which represents the options for signing in to your computer and this would be the case if you’ve set up a picture password, PIN or any other type of sign-in option to make your machine more secure. You will also see a round button at the left of your account picture that has an arrow left icon in it and this is the one that you will need to click in order to see all the other accounts that are registered in your computer as you can see on the screenshot below.

When you arrive on this screen, just select the user that you want to use in accessing Windows 8.1 and if a password is assigned to it, you’ll be required to enter it first before you can finally use the computer. Just repeat the same process if you want to switch to another user account and this is applicable in any Windows 8.1 machine that has multiple accounts that are registered to it.