Tips for Tweaking and Improving the Mail App
Windows 8.1 has a good set of built-in apps which will surely improve your productivity many times over and one of it is called the Mail app. Previously, we’ve learned the basic tweaks that you can do with the app and its tile which is pinned on the Start Screen and learned how to link another account to it so you can manage your emails from different email accounts in one easy to access location without using a browser. However, there are still a lot of other tweaks and settings which will help you improve the Mail app or make it work the way you want it to. To learn all these stuff, simply read this tutorial from top to bottom.
Accessing the Mail App Options
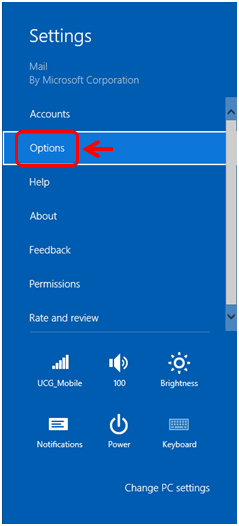
All modern style apps have options that can be accessed from the Settings screen and to access this section on each one of them like the Mail app for instance, you will first need to open and access the app’s main screen and once you are on it, simply access the Settings charm by pressing on the Windows + C keys and clicking or tapping on the “Settings” charm located at the bottom of the bar.

Another way of accessing the Settings screen for the Mail app which is faster compared to the previous one is by pressing on the “Windows + I” keys while the Mail app’s main screen is open. After you do so, the Settings screen will appear on the right edge of the screen and from here, you’ll need to click on the “Options”.
After doing so, the “Options” screen will appear and you will see some on/off toggle switches for certain settings. If you want to arrange your emails according to conversations then you will need to turn on the option that says “Group messages by conversation”. Next, you can also choose to show messages from sent items in your conversation list by turning on the second option while the third one allows you to mark the unread messages as read whenever you select them. To turn off any of these options, all you need to do is click on the toggle switches and it will turn from On to Off right away.
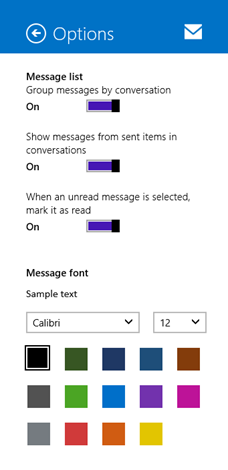
Lastly at the bottom of the “Options” screen is a section that says “Message font” bearing two drop-down boxes for adjusting the font style and as well as the font size for the Mail app. Below these boxes are font colors which you can set for the Mail app font which you selected.
Switching from One Email Account to Another
As I mentioned earlier, the Mail app allows you to link all your email accounts from different email service provider. If you still don’t know how to do this, simply read our tutorial which describes the steps in linking another account to the Mail app. After linking a new email account to the Mail app, you will see all your linked email accounts listed at the bottom-left corner of the screen which you can simply click whenever you want to switch from one account to another. When you do this, the list of emails and menus will change to the one supported by the email service provider which you selected.
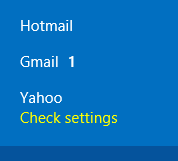
From this display, you will know if there is a new email in one or more of the linked accounts if you see a number at the right of the email service provider’s name. The number that appears indicate the number of new emails that you received. The screenshot above indicates that I have one new email in my Gmail account and if I want to see and read it, all I need to do is click on it and my Gmail account will open on the Mail app’s main screen.
Viewing and Responding to Emails
If you use the Mail app, you will be able to respond to some emails faster compared to using a browser in checking and responding to emails. The great thing about it is you won’t need to open multiple Windows or tabs just to check different email accounts. To respond to some of the emails that you have in one of your email accounts, all you need to do is select it and once it opens, simply click on the “Respond” button at the upper-right hand portion of the screen and click or tap on the “Reply” option from the small options box that appears.
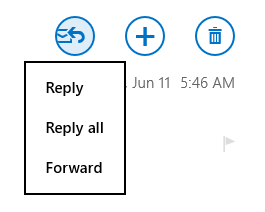
You can also choose the “Reply all” option so you can send a response to all the emails sent to you by a person all at once. You can also find the “Forward” option from the small options box that appears. Forwarding an email means that you will just be sending the content of an email that you received to another person without having to type the message again and upload any attachment that it contains since the whole email including its attached files will be sent when you choose to forward it.
Removing an Account from Being Linked
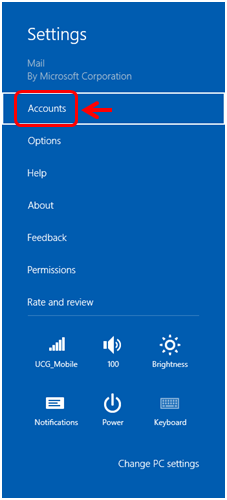
As you link multiple email accounts to the Mail app, there might be others which you don’t really use any longer. If this is the case, you can remove the account from being linked to the Mail app so you can free some space for other more important stuff. To do this, simply open the Mail app and once you are on its main screen, you will need to access the Settings screen by clicking on the Settings charm. You can access the charms by pressing on the Windows + C keys and once the charms bar appears, just click on the one that is labeled “Settings” found at the bottom. After doing so, the settings screen will appear and from here, click on the “Accounts” option.
After doing so, the “Accounts” screen will open from the right-edge of the screen showing a list of all the email accounts that are currently linked to the Mail app. Just select the email account that you want to remove and once its settings opens on the area of the screen, you will need to scroll down and click on the “Remove account” button.
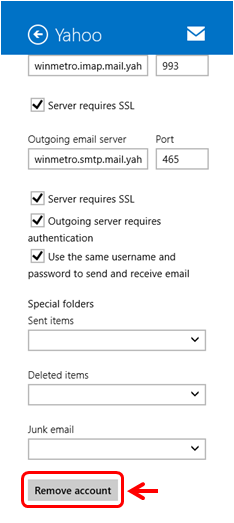
After doing so, the account will be removed from the Mail app and all its messages will not be seen from the live tile display of the Mail tile pinned on the Start Screen.
Get Quick Access to All Your Emails
As you can see, the Mail app does more than what browsers do in giving you access to all your email accounts. It is also provides some very convenient ways in managing your accounts and the messages that it contains but since we don’t have enough space in this tutorial to tackle all these stuff, we’ll be touching everything that has to do with it in our next tutorial. For now, just take time to explore the main screen and master all the steps that I have shown in our past two tutorials.