Troubleshooting Device Installations in Windows 8.1
A computer that runs on Windows 8.1 may already work great on itself but connecting other devices to it will enhance its performance or even add more features to it. This is a great thing to do especially if you are trying to use your computer in doing business like desktop publishing which will require a printer or doing online freelance job like a remote virtual assistant or customer support service which needs a good headset having a built in microphone. No matter for what purpose you are planning to use your Windows 8.1 machine for, you will need to learn how to connect external devices to it and troubleshoot any problems that may occur along the process. The term “troubleshooting” may sound very technical but as you will see in this tutorial, the process is actually guided by a wizard that will make the process become easier than you ever think it is.
What Devices can be Connected to Windows 8.1?
Just like its predecessors, Windows 8.1 allows users to connect a variety of devices that are compatible with the operating system itself. This would include printers, headsets, microphones, webcams, external keyboards, USB WiFi adapters, Bluetooth adapters, tuners and many others. Most devices that are compatible with Windows 7 is also compatible with Windows 8.1 but it would be good if you can get a device that is really compatible with Windows 8.1. You will know this by simply checking on the packaging of the device itself or the installer disk that is included with it.
Checking the Devices Connected to Windows 8.1
Unlike Windows 7, the Control Panel in Windows 8.1 is not accessible anymore from the Start Menu purely because it has already been removed from the brand new operating system by Microsoft. Learning to access the Control Panel section is important so you can get access to the Devices and Printers section which contains the list of all the external devices that has previously been connected to your machine.
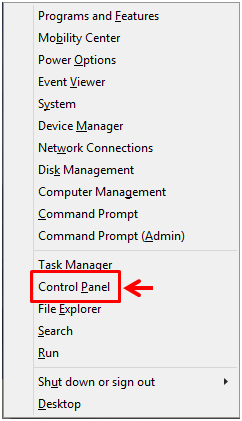
To access the Control Panel Window in your Windows 8.1 machine, all you need to do is press the “Windows+X” keys to access a hidden menu which appears at the bottom-left portion of the screen. This menu contains some shortcuts to very important system locations which includes the Control Panel. When the menu appears, simply click on the link in it that is says “Control Panel” and the main Window of the Control Panel section in your Windows 8.1 machine will open.
When the main Control Panel Window opens, you will be able to see some links containing a set of sublinks under them. From these links, just pay attention to the one that says “Hardware and Sound” and when you’re able to locate it, simply click on the sublink under it that says “View devices and printers”.

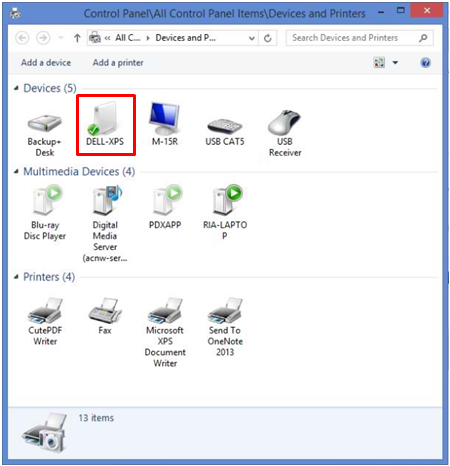
After clicking on the sublink, you should be able to access the Window where a list of thumbnails representing all the devices and printers that have been connected to your computer somewhere in the past. From here, you will be able to see whether the device has been successfully installed or not. This section will also let you find out if a certain device works normally or not. All that you need to do is try to connect the device to your computer and watch if it is going to get a triangle icon containing an exclamation point overlay (!) on it or a circular icon that has a check mark within. The former means that there is a problem with the device and the latter means a “go” or the device has been properly installed and will work perfectly in doing its functions. The screenshot below shows an example of a thumbnail that represents a device which is properly installed and is ready to be used.
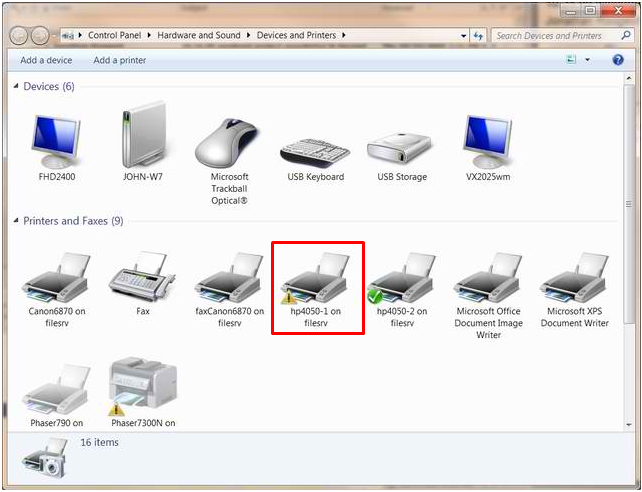
On the other hand, if a device such as a printer is already connected to your computer but is having some issues or if it’s not working as it is supposed to function then you should be seeing a thumbnail that looks like the one shown on the screenshot below.
So that’s how you identify a problematic device or printer that is currently connected to your Windows 8.1 machine. Now that you learned this crucial step, it is time to learn how you can troubleshoot the problem and have it solved using a Wizard that will guide you through the whole process so you don’t really need to be intimidated or even hesitate to do it.
Troubleshooting a Problematic Device
After finding out that the device which you have connected to your Windows 8.1 computer is not working properly, it is time to learn how you can troubleshoot or repair the device installation to get it to work normally. What you need to have in mind is that there could be two possible scenarios of why the device is not working properly.

First is something that has to do with the physical connections like wires, power plugs and even the power button on the device itself and these are the things that you need to check on first. Try to check first on all of these stuff before using the troubleshoot wizard. If you see that everything is in its proper place and all the wires are properly connected on both ends, power wires plugged into a power source and the device is turned on but still the thumbnail that represents the device under the Devices and Printers Window has the yellow triangular icon overlay, it means that the problem has to do with software, driver and some other software related stuff that is preventing the device to function as it is supposed to. In this case, you will need to use the troubleshoot wizard.
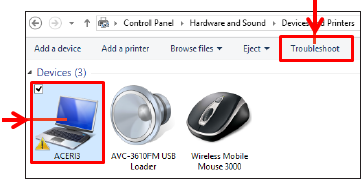
To do this step, simply select the thumbnail that represents the device found in the Devices and Printers Window. After it gets selected, you will need to put your attention to the tab that is located just below the system location box at the top of the Window and from this tab, look for the link that says “Troubleshoot”.
Right after clicking the link, the wizard will initialize and will automatically look for the problem on the device. If the problem is on the installation, you will be informed by the wizard that you will need to install the drivers for the device once again by using the installer disk that came with it but if the problem is something else and the wizard was able to identify it, you will see a prompt that will ask you to “Apply this fix” or not. If you decide to apply the recommendation that was offered by the wizard, just click on the “Apply this fix” option and the solution will be applied right away.

And that’s all there is in troubleshooting a device that has already been connected to your Windows 8.1 machine. As you can see solving a problem that is currently troubling any of the device installations that you have on your computer is not that hard. The troubleshooting wizard does everything automatically and all that you need to do is follow the steps that it shows so you can finally solve the problem and start using the device in doing the tasks that you want to accomplish.