Tweaking Some Keyboard Settings
Windows 8.1 makes the use of keyboard a lot flexible! Because of the operating system’s mobile and PC environments, users can now interact with it in different ways which are no way to be found in previous Windows editions such as Vista and Windows 7. However, just like most of the newly-introduced features in Microsoft’s latest operating system, there are some settings of it which are not that familiar especially to the ones who are just starting to get familiar with the operating system. In this tutorial, we will get to know some settings of the Windows 8.1 keyboard so you can tweak it anytime you like. There are also some additional options for specific keys that will allow you to control the appearance of charms and all the other brand new features that is included in the Windows 8.1 operating system so get yourself ready and follow the steps that I will be showing below.
Available Keyboards in Windows 8.1
If you are using a PC, there surely is a separate keyboard that is included with it and the same is true with laptops that are really laptops in the fullest sense (not the transformer types and other newer devices). In these types of devices that I have mentioned, you can surely use the physical keyboard (the hardware itself) in providing input to it and in case one of the important keys gets busted, you can use the “On-screen keyboard” tool which is one of the very useful feature that you can use in case you run into some problems involving the hardware itself.
In the newer devices that run in Windows 8.1 such as transformer tablets and others. you can also use the touchscreen keyboard in case you switch to the tablet mode and the on-screen keyboard is still available in this types of devices which give you more choices of tools just in case any problem occurs in any instance.
Accessing the Keyboard Settings Section
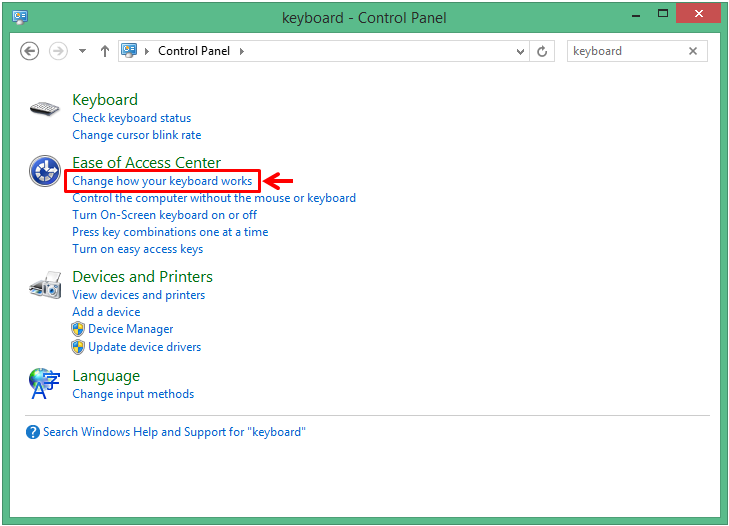
Just like all the other Windows editions, Windows 8.1 offers different ways in accessing the features that are bundled with it and this includes the keyboard settings section. For instance, you can use the search box in the metro environment to look for this particular section or you can also take advantage of its desktop equivalent which is the search box that is located at the top-right portion of the Control Panel Window. To do the former, just press the Windows + S keys in order to make the search metro screen appear at the right edge and once you see it, simply enter the word “change keyboard” into the search input box that is provided. After doing so, the search results should appear just below the box and from here, you will need to click on the one that says “Change how your keyboard works” as highlighted on the screenshot below.

After clicking the search result, the Window that contains the keyboard settings will appear but before we get into the details of how you can tweak certain aspects of it, we will first learn how the second method in accessing this section in your Windows 8.1 machine is done.
To access the keyboard settings section using the search input box on the Control Panel Window, all you need to do is access the Control Panel first by pressing the Windows + X keys in order to access a hidden menu or you can also right-click on the Start Button in order to access the same menu. Once the menu appears at the bottom-left portion of the screen, simply hit the link in it that says “Control Panel” and its main Window should open after a few seconds.

On the main Control Panel Window just enter the word “keyboard” into the input box that is located on its top-right portion. After doing so, you should be able to see all the search results that contains the word “keyboard” on the content pane and from here, you will need to click on the one that says “Change how your keyboard works” so you can finally open the section where some of the keyboard settings are located.
The screenshot above shows where the link is actually located so just look at this particular spot on your Windows 8.1 machine and click on the link once you’re able to locate it.
Making Tweaks with Keyboard Settings
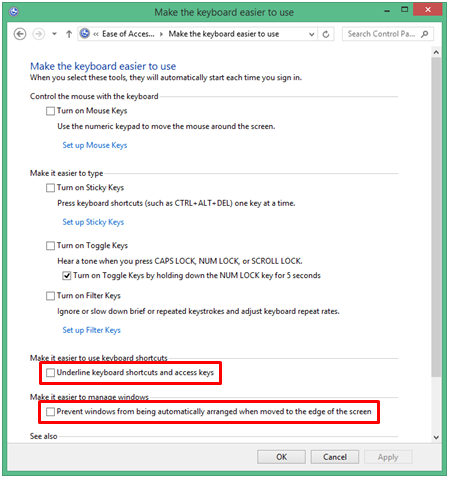
Now that you were able to access the keyboard settings Window which is also labeled as “Make the keyboard easier to use”, you should notice a number of settings which are labeled as “Control the mouse with the keyboard”, “Make it easier to type”, “Make it easier to use keyboard shortcuts” and “Make it easier to manage Windows”. There’s also a section that says “See also” and from here, you will see other links leading to even more keyboard settings and as well as a web link that will give you more idea of other assistive technologies.
Setting Up the Mouse Keys
The first setting involves turning the keyboard into a mouse pointer controlling device. To start doing this, just click on the link that says “Set up Mouse Keys” as shown on the screenshot below.
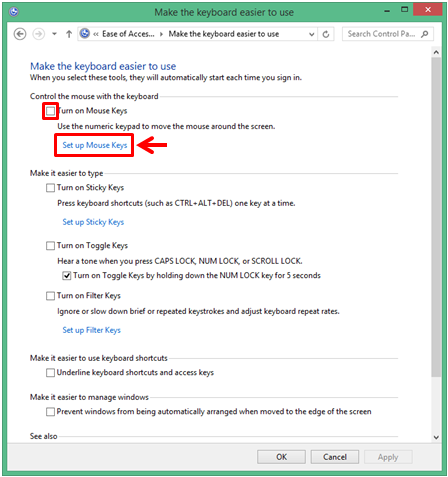
You will also need to mark the check box located just above the link to activate the setting itself. After you click on the link, you will be able to open some other details of the particular setting for mouse keys. From here, just take some time to read through the descriptions and enable the settings that you want to activate in your computer.

Once you are done making tweaks and enabling some aspect on this section, simply hit the “Apply” then “OK” buttons at the bottom of the Window to save all the changes you made and get back to the main keyboard settings section.
Making the Keyboard a Lot Easier to Use
The next settings will now involve even more aspects of your computers keyboard. Under the “Make it easier to type” section, you should be able to see three other settings which are labeled as “Turn on Sticky Keys”, “Turn on Toggle Keys” and “Turn on Filter Keys” all having a check box which you can mark by clicking in them in order to activate the setting itself. If you want to change some other aspects of the “Turn on Sticky Keys” section, all you need to do is click on the “Set up Sticky Keys” link as highlighted on the screenshot below.
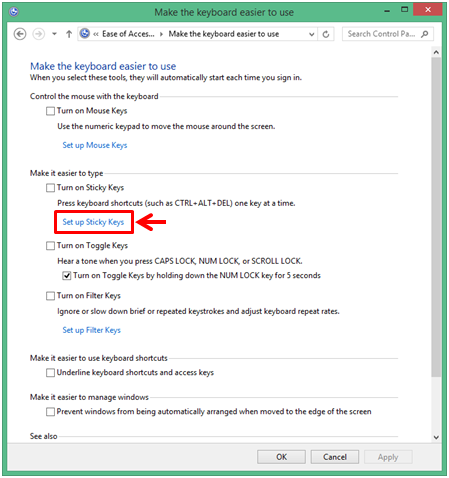
After the link is clicked, you will be taken to a Window that contains even more settings and tweaks for the Sticky keys as shown on the next screenshot. From here, simply read the descriptions of what each setting does and enable or disable them as you wish.

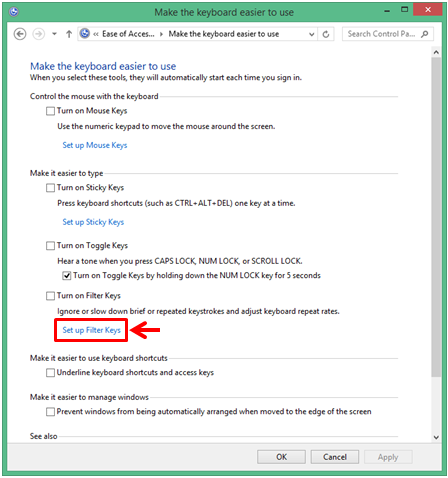
Again, after doing some changes on this section, you will need to click on the “Apply” then “OK” buttons to save all the changes and make them final. Now, the next option which says “Turn on Toggle Keys” only has a check box for enabling the feature itself and another check box under it which should be marked by default, there are no other settings for it so you won’t find a link under it like the others.
Moving on, you will find another check box which says “Turn on Filter Keys” and again, a link that leads to even more settings of it appears at its bottom portion. Try to click on this link and you should be able to see all available “Filter Key” settings and all you need to do is read what each one of them does so you can finally know which ones to enable or disable.
Finally, you will see two other options which says below the “Turn on Filter Keys” section which says “Underline keyboard shortcuts and access keys” as well as “Prevent windows from being automatically arranged when moved to the edge of the screen”. If you want to enable these options, all that you need to do is put a check mark by clicking inside the check boxes assigned for each one of them and once you are done, simply hit the “Apply” then “OK” buttons.
As you can see, making some tweaks with the Keyboard Settings has been made a lot easier in Windows 8.1 and if you want to learn even more stuff about Microsoft’s latest operating system version, just stay in tune with us only here at windowstechies.loc!