Tweaking Windows 8.1’s Network Settings from the Metro Screen
To most of us who have been using Windows for a long time, making tweaks to any section or aspect of the operating system through the desktop screen particularly the Control Panel is very easy. Stuff such as setting up a HomeGroup, creating a new user account or deleting one and even changing some network properties are all done easily through the desktop environment but in Windows 8.1, you need to be aware that there is actually more than just the desktop screen in doing some changes on any aspect of this latest operating system by Microsoft. Yes! you can actually make some tweaks from the new Metro screen environment and that’s what we will be talking about in this tutorial so get your Windows 8.1 machine ready in doing the steps that will be illustrated below.
Accessing the PC Settings Section
If you want to make some tweaks to Windows 8.1’s network settings from the Metro screen then you will first need to access the PC settings section. There are many ways in doing this but we will just be showing the easiest ones here and it is up to you to choose which method you find to be comfortable to use.
First is by pressing the Windows+I keys and after you do so, you will be able to access the Settings screen which will appear from the right edge. From here, all you need to do is click on the tab at the bottom that is labeled “Change PC settings”.
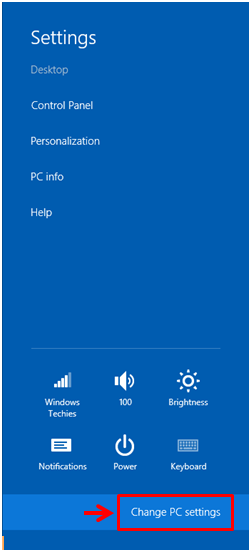
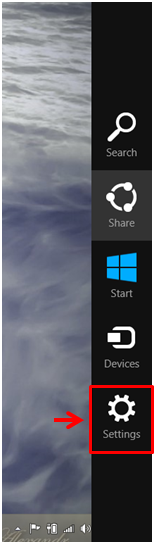
Another way in accessing the PC settings screen is through the Settings charm. To do this, you will need to summon the charms by pointing the mouse to the top or the bottom-right corner of the screen then drag the mouse downward if you pointer it on top or upward if you pointed at the bottom and after you do so, a narrow black bar will appear from the right edge of the screen which contains 5 icons. From these icons which are commonly called “Charms”, simply click on the one at the bottom which is labeled “Settings” and you will be able to access the Settings screen right away. Again, from this screen which is the same as the screenshot above, you will need to click on the “Change PC settings” tab located at the bottom.
The last method in accessing the PC settings metro screen is through the Apps view section and doing this is very simple. Just open the Start Screen first by clicking on the Start Button or pressing on the Windows key and once you are on it, you will need to move the mouse a little bit until you see a circular button with an arrow down icon in it that will appear from the bottom-left portion of the screen. Once you see this button, just click or tap on it and you will be taken to the Apps view screen.

Now, from the Apps view screen, all you need to do is look for the shortcut that is labeled “PC settings”. Once you are able to locate the shortcut, you will need to click or tap on it so you access the PC settings metro screen and from here, you can start making some tweaks in the different aspects and sections of the Windows 8.1 operating system.

What Lies Under the Network Link?
One of the most important section in a Windows 8.1 machine are the settings that has to do with network connections. To most users, a computer or mobile device would not be that useful if it can’t even connect to a network that allows Internet access. In this latest operating system version developed by Microsoft, accessing some network settings is done in different ways and this time, we will try to access some tweaks on the network settings of your Windows 8.1 machine from the Metro screen and in order to do this, you will need to click on the link located at the left hand portion of the PC settings screen which says “Network”.

When the Network section opens, you will see another set of links still at the left-hand side of the screen which are “Connections”, “Airplane mode”, “Proxy”, “HomeGroup” and “Workplace”. Now, we will go through each of these links and see what lies in each one of them.
Connections
When you click on the Network link in PC settings, it will automatically open the section that will display the contents which are under the “Connections” section. From here, you will see the WiFi network which your computer is currently connected to.

Now, try clicking on this icon and you will be able to access some other options for your network connection such as “Find devices and content”, “Data usage”, and “Set as a metered connection”. What these options do are described clearly on the same screen so take time to read on what each item is used for before finally turning the toggle switch on or off.

At the bottom of this same Window, you will be able to see the “Properties” section which displays some important information about the network which you are connected to. These information are very important especially if you want to know the manufacturer of your computer’s WiFi adapter just in case you’d like to update its driver to the latest version. Other details such as “Security type” will be very useful especially if you want to match your computer’s network properties to that of your router’s
Airplane Mode
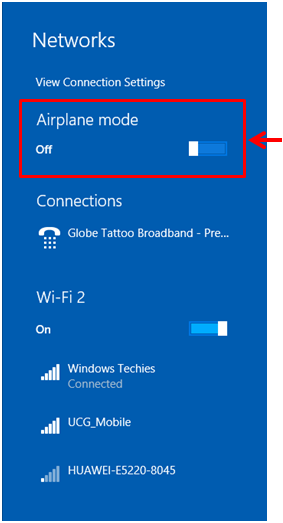
When you are traveling on a plane but you’d like to still use your Windows 8.1 device to read something, you will need to turn on the Airplane mode which essentially disables all wireless adapters on your computer to comply with every flight policy of turning off any radio device so as not to interfere with the plane’s navigation and communication systems. To turn “Airplane mode” on or off, simply click on the “Airplane mode” link and flick the toggle switch to your desired settings.

Another way in accessing the “Airplane mode” switch is by clicking on the network status icon located on the system tray at the extreme-right end of the taskbar and after doing so, you will be able to access the “Networks” screen which will appear from the right edge. From here, you should be able to see the “Airplane mode” switch which you can easily turn or off quickly anytime.
Proxy
If you want your network to run under a proxy server then you will need to access the proxy settings simply by clicking on the “Proxy” link located on the Network metro screen. From here, you can choose between “Automatic proxy setup” or “Manual proxy setup” but if you don’t have any idea of what these settings do, it is better that you will just leave it untouched.

HomeGroup and Workplace
The last two links on the Network metro screen are both for used for setting up a sharing network in two different settings. One is for use at a home setup where most of the users are those that you really trust while the other is for your workplace where much of the documents for business processes can be transferred from one station to another. To learn how you can setup Home Group from the desktop screen, you can read our tutorial that describes the steps which are involved in the process. You can also create a HomeGroup or join an existing one from the metro screen and all the details in doing so are found in this tutorial. Feel free to read them and master the steps so you can get easy file transfers right at your fingertips!