3 Registry Tweaks That Will Remove Annoying Features in Windows 8.1
One of the worst comments that loyal Windows operating system users ever gave to Windows 8.1 when compared to the previous Windows editions like Vista or Windows 7 is that it’s quite hard to get control of especially when most of its new features are put into consideration. Microsoft’s attempt to merge two different worlds into one which are the Desktop and the Tablet environments really had its own set of advantages but we really can’t overlook the fact that because of the old features which has been removed to give way to the brand new ones, some loyal users who already loved the previous Windows editions were really left lost and confused.
An operating system that behaves well and can easily be controlled is crucial especially if you are using it for some important task in your business or work. A user’s familiarity is also a big factor that would greatly affect productivity and ability to accomplish tasks a lot faster. In this tutorial, we will be discovering some tweaks that will help you control Windows 8.1 in an easier manner and make it work as you would like it to.
NOTE:
The tweaks that we will show in this tutorial would involve some changes in the Registry files and entries of your computer’s operating system. The Registry contains commands, rules and parameters of how built-in and as well as installed programs should work so if you are not sure and confident enough in doing the edits, it would be helpful if you seek assistance from someone who has the knowledge to do the changes. Errors and other mistakes in editing Registry files may cause serious problems with your operating system so we advice you to do the steps shown below with caution.
Remove the App Switcher Bar
When you point the mouse to the top-left corner of the screen probably when you are looking for a something using File Explorer or you’re a file in Microsoft Word and the mouse accidentally touches the edge, the App Switcher bar appears. This bar stretches from the top-left corner down to the bottom and contains some thumbnails of all the modern apps or what is also known as Windows Store apps that you have opened in an earlier time while you are using your computer.
If you are constantly annoyed by this new feature appearing again and again whenever you try to point the mouse to the top-left corner of the screen then you can remove/disable it. To do this, you will first need to access the Registry Editor tool by first pressing the Windows + S keys on your computer’s keyboard. After you do so, the Search charm will slide in from the right edge and from here, simply input the words “regedit” into the search box.
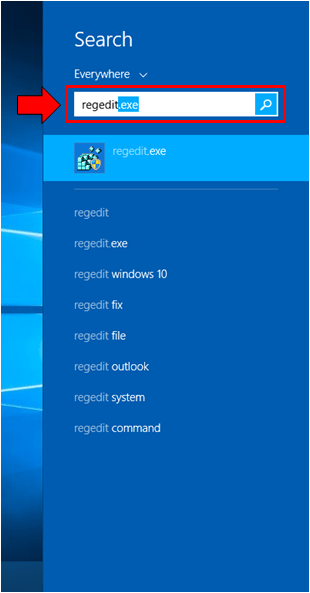
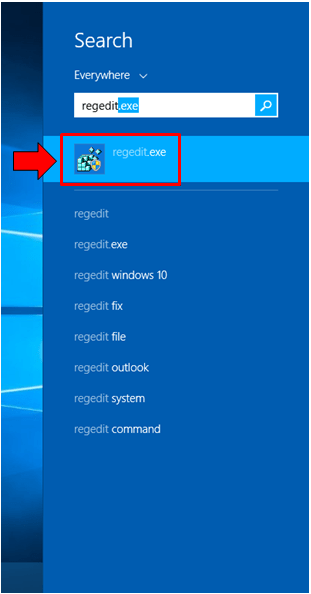
Now, after the words are entered into the box, don’t press or click anything and just wait for the “regedit” shortcut to appear just below the input box. Once it appears, you will need to click on it and the Registry Editor tool will open.
You will then need to navigate to the “HKEY_CURRENT_USERSoftwareMicrosoftWindowsCurrentVersionImmersiveShell” location and once you are able to find it, you will need to right-click on the “Immersive Shell”, select “New” then hit the “Key” option. You will need to create a key and name it as “EdgeUI”.
Once the new key is created, you will again need to right click on it (EdgeUI) then select “New” again and click on “DWORD (32-bit) Value”, just enter the name “Disable TLcorner”. After that, just double-click the new value and enter “1” into the “Value Data” field and you’re ready to go!
Remove the Charms Hint
Another brand new feature which can be quite annoying is called the Charms Hint. You will see this feature whenever you touch the top-right corner of the screen and they appear as 5 while icons representing each charm. To disable this feature, you will again need to browse to the “HKEY_CURRENT_USERSoftwareMicrosoftWindowsCurrentVersionImmersiveShellEdgeUI” location using the Registry Editor Tool.
Now, when you find the “EdgeUI” folder, just right-click on it, select “New” then click on “DWORD (32-bit Value)”. After doing so, you will need to enter the name “DisableCharmsHint” then press the “Enter” key.
Again, just like what you did earlier, you will need to double-click on this new value and enter “1” into the “Value Data” field. To save everything, simply click on the “OK” button and you’re done.
Remove/Disable the Lock Screen
Another feature in Windows 8.1 that can be very annoying is the Lock Screen. Windows 8.1’s screen automatically locks after a set period of time. You can actually change the length of time before the screen locks by customizing it from the “Power Options” section of the Control Panel or doing some editing on the Registry. To do the former, you will simply need to click on the Power/Battery Level indicator icon that is located on the system tray (the extreme-right portion of the taskbar) and you will see small box containing the charge level, power plan settings and two other links as shown below.
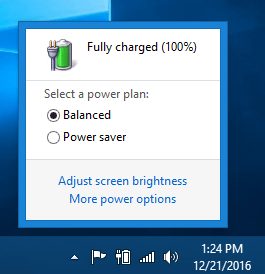
From the two available links, simply click on the one that says “More power options” and you will automatically be taken to the Power Options section of the Control Panel. Once this Window opens, click on the “Change plan settings” located at the right portion of the current power plan setting that is set active on your computer.
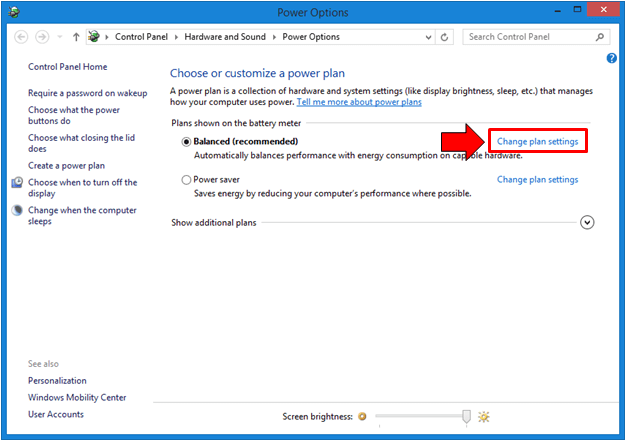
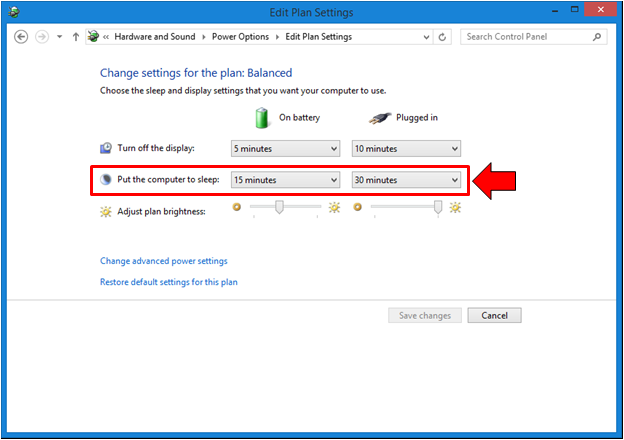
Now, the Window that follows will then show you the aspects of the power plan that you can make some changes with. From here, you will need to set the “Put computer to sleep” settings into “Never” since making your machine sleep will lock the screen as well. Once you are done changing this setting, simply click on the “Save changes” button located at the bottom-right portion of the screen and you’re done.
On the other hand, if you really want to disable the Lock Screen, you will need to do some registry edits. To start, you will again need to access the Registry Editor tool by following the instructions that we gave above and once it opens, simply navigate to the location quoted below:
“HKEY_LOCAL_MACHINESOFTWAREPoliciesMicrosoftWindows” (excluding the quotation marks)
Once you are on the “Windows” registry folder, look for a subfolder that is labeled “Personalization”. If there is not such entry, you will need to right-click on the “Windows” registry folder, select “New” the click on the “Key” option then give the name “Personalization” to it and finally hit “Enter”.
Now, when you’re done creating the “Personalization” subfolder under the “Windows” registry folder, simply right-click on it then select “New”. On the box that appears, you will need to click “DWORD (32-bit) Value” then put the name “NoScreenLock” for the new value created and click “Enter”. Afterwards, just double-click on the new value that you have created and type in “1” in its Value Data field.
Enjoy a Smoother Windows 8.1 Machine!
As you can see, removing some of the new features in Windows 8.1 that has the tendency to become annoying at times is quite easy but as we have said in the first part of this tutorial, you need to be careful when making some changes to the registry since one single mistake can lead to a more serious problem that’s many times annoying than the feature that you are trying to get rid of. Just follow the steps that we have shown above and you should be on your way to making your brand new computer a lot more comfortable to use!