Understanding the Tiles
Recently updated to Windows 8 or Windows 8.1? Chances are you are a bit confused with some terms used to describe some features that were recently added to the brand new operating system developed by Microsoft. There were really a lot of things that have changed in the latest Windows operating system but knowing them all and learning how to use them isn’t that hard.
All you need is the willingness to learn more and explore deeper into each one of them. One of the newest feature in both Windows 8 and Windows 8.1 are called “Tiles” and they make up most of the stuff that are found on the Start Screen. In this tutorial, you will be able to learn what “Tiles” are, where they come from and how to make tweaks on each one that appears on your computer’s Start Screen. Just read on to learn more of the details.
What are Tiles?
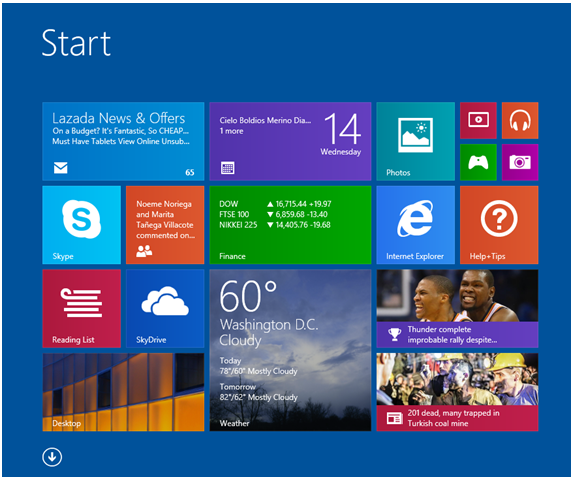
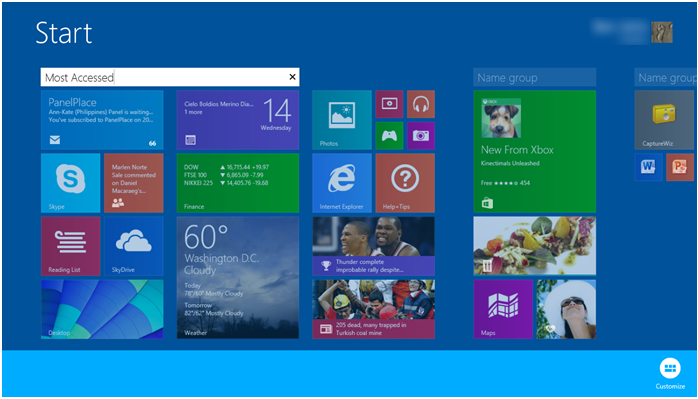
Tiles are technically shortcuts which represent each modern-style app that are installed on your Windows computer. Each time you install an app from the Windows Store, there will automatically be a new tile that will be added to the Start Screen which would serve as a shortcut to the newly installed app. Tiles can either show the name of the app or its logo while others show a live information sliding one after another. A tile that does this is called a “Live Tile”.
On the screenshot below, the Calendar, Email, Finance, News, People, Sports and Weather tiles show an up-to-date information of what they contain hence, they are considered as “Live Tiles” that are built-in with Windows 8.1.
Where Do I Get Some Tiles?
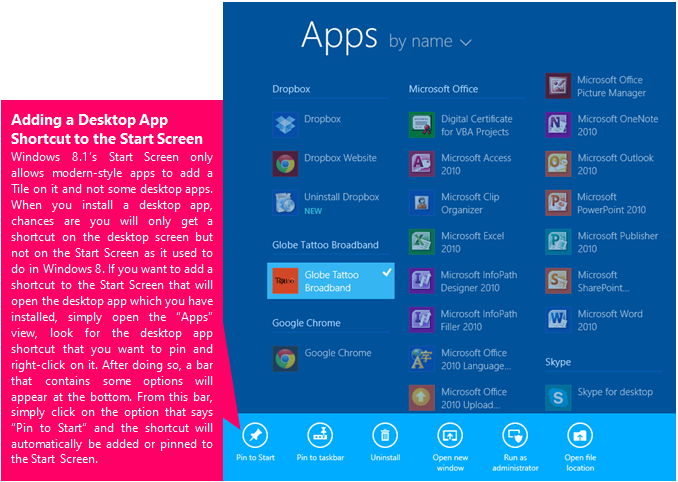
A tile is not a separate entity from the modern-style app that it represents so there is no way for you to get just a tile without downloading an app from the Windows Store. Every time you install a new stuff coming from the Windows app marketplace called the “Windows Store”, a tile that represents the app will automatically be added to the end part of the Start Screen. Back in Windows 8, even desktop apps are allowed to add its shortcut on to the Start Screen after it gets installed but this made everything look crowded so Microsoft made some changes and restricted the Start Screen only for tiles and not for shortcuts.
If you want to add a shortcut or a system location to the Start Screen on Windows 8.1, you can easily do so by first accessing the “Apps” view, look for the shortcut or system location that you want to pin to the Start Screen and once you find it, simply right-click on it and click on the option that says “Pin to Start” located on the bar that appears at the bottom of the screen.
Reducing the Number of Tiles and Shortcuts
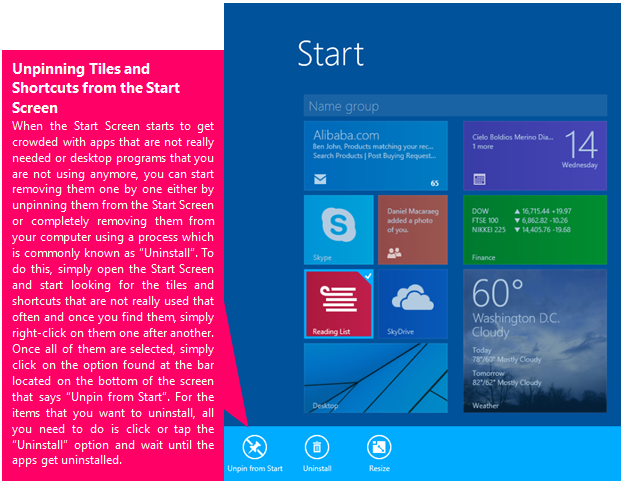
In time as you install more and more apps and pin even more shortcuts to the Start Screen, it can start to look cluttered and disorganized. If this happens, you can start removing tiles and shortcuts representing some apps that are not really used that often or those that doesn’t need to be accessed quickly.
Before doing this crucial step, be sure to have a look at the contents of the Start Screen and start making a list of the apps and shortcuts that you want to remove. Once the list gets completed, you can start removing or unpinning the tiles and shortcuts. For the tiles and shortcuts that represent some unused program on your computer, you can choose to uninstall them to free some Start Screen and as well as hard drive and memory space.
Rearranging Tiles on the Start Screen
The current arrangement of the tiles and shortcuts on your computer’s Start Screen is not permanent. You can still make some changes on how they are arranged and group them according to your preference. This is done simply by doing a click and hold gesture using a mouse or your finger and dragging the tile to your desired location on the Start Screen.
Changing Tile Sizes
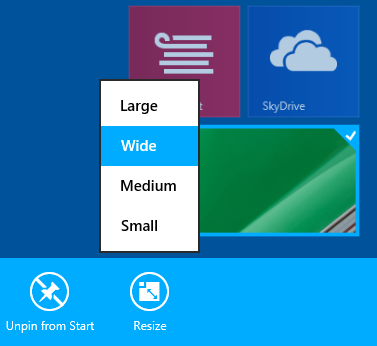
Tiles come in different sizes so you’ll need to either make them smaller or larger so you can create a well-arranged group. There are three default sizes that you can choose from which are “Small, Medium, Wide or Large“. The screenshot below shows tiles in different sizes.
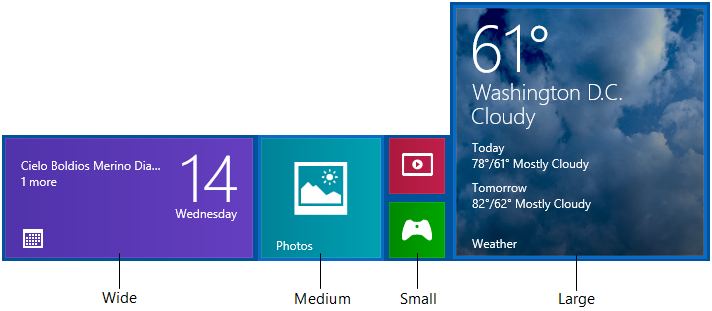
To change the size of a tile, all you need to do is right-click on it then click or tap on the “Resize” option located on the bar at the bottom of the screen. After doing so, a new set of options will appear where you can select the size that you want to assign to the selected tile.
Naming a Group of Tiles and Shortcuts
After arranging the tiles and shortcuts into well laid-out groups, you can start naming each group to aid in the easier search and access of some important apps and programs as well as those that you frequently use. To do this, you first need to open the Start Screen and right-click on any tile or a shortcut. After doing so, you’ll see a box labeled “Name group” lying on top of each group which you created. Once you see this box, just click inside it and you’ll see that it will turn white and the cursor will now be inside it. When this happens, you can start typing in the name that you want to assign to the group then hit the “Enter” key.
After pressing the “Enter” key, the assigned name will now appear on top of the group and it will stay there unless you remove or change it.

An Exciting Journey has Started
Now that you know the basics about Tiles, it is time to delve into some deeper aspects of the Windows 8.1 system but of course, we’ll start the long yet exciting journey with some tips of the basic features that you need to master in order to use the operating system like a boss. Stay tuned with us for more tips and tricks as well as informative guides about Windows 8.1. For topic suggestions and recommendations, please feel free to leave them as comments on the section provided below.