What are Libraries and How You Can Create One
The Library is a new feature on Windows 7 which is one of the coolest so far. It helps organize folders and files efficiently. Libraries may sound like some hard-to-setup stuff but the truth is it is easy to create and once it is there, you can easily proceed on with adding the files which you want to store in it. With this feature, you can build a set of folders and files so that you can access any stuff that you need in a few clicks. It also allows you to edit, sort and tag files with just a few easy steps. Once you have a good set of libraries setup on your Windows machine, you will surely be spared from all the clicking, searching and jumping from one folder location to another just to get all the files that you need to print, copy and transfer to a storage device or sent via email.
Sounds great? Well there’s more! The libraries feature also helps you be at ease especially if you have a network of computers which you want to have access to some common files. This is very useful especially in small office settings or even on the network that you have at home.
This article aims to explain what libraries are, show how one works and how you can create a new one on your Windows 7 machine. You’ll also learn how to add some folders to it which contains all the files that you want to have a quick access to and finally learn some advantages that it would bring once you use it on your network of computers either at home or in the office. Just read on towards the end of this article to learn how you can do these things.
What Exactly are Libraries on Windows 7?
Windows Library is a collection of files and folders within your Windows system. It is considered virtual because of the fact that it does not really exist as a real folder that you can touch. It can also be referred to as a reference to one or more folders that are collectively placed in it with all the files contained within them. For instance, you can actually store a folder containing multiple files in the “Documents” library, on your “Desktop” and in other locations where you want to store it in. You can also create a “Documents” library which contains a reference to all of the folders saved in different locations of your system. Once you open this library, you will see all the other folders appearing as sub-folders and the files in each would appear as even more sub-items when you click any folder. This is the reason why it is called the “Documents Library”. This awesome feature lets you have an organized file system which combines all files in one location regardless of where they really are located in your system which means big benefits and improved productivity especially if you’re working on many files which are spread in different locations.
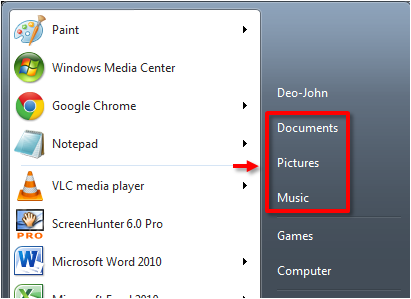
Windows 7 has the “Documents”, “Pictures” and “Music” libraries by default. They are all found one after another on the upper-right portion of the “Start Menu” as shown on the screenshot below. But, this doesn’t mean that they are the only ones that you can use, you can actually create as many as you want according to your need.
The “Libraries” section can also be accessed on Windows Explorer’s left side panel as you can see on the screenshot below.

Clicking on any of the items on the “Libraries” section of Windows Explorer opens all the folders and files that are linked to it .
Creating a Library on Windows 7
Next thing that you need to learn is how to create a Library of your own . This sounds complicated but it is a very simple step. All you need to do is open Windows Explorer then click on the “Libraries” item on the left-side panel also called the Navigation pane. You will then see a button labeled “New library” at the top portion of the Window just below the address tab. Just click on it then type the name that you want to assign to your newly created “Library”.

Or you can also do the same thing by clicking on an empty space anywhere inside the Window then select “New” then click “Library”.
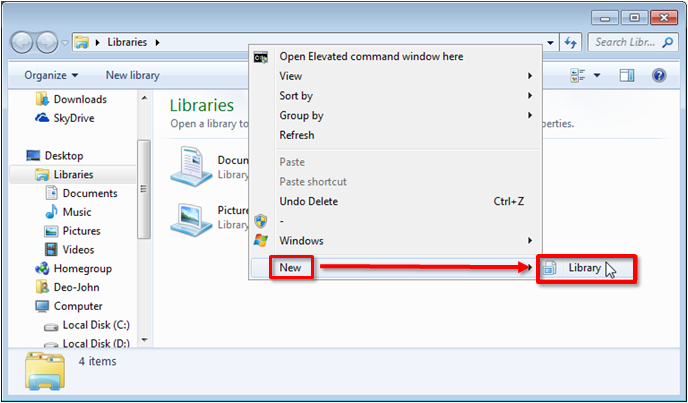
After that, you can type the name of the newly created Library. Remember not to name it the same as the existing ones to avoid confusion.
Adding Folders to a Library
After creating a library, you now have it listed together with the ones that are already there by default but since it is empty, you need to put some contents to it according to your choosing. You can put any sort of folders which contains documents and pictures which you want to distinguish from the rest or videos and other contents which you want to have easy access to. The adding process may take time especially if you’re adding a lot of files or folders to it. During the process, a progress bar will appear which looks like the screenshot below. Once the process is done, the progress bar will disappear and you will see all the contents you added inside the library you’ve just created.

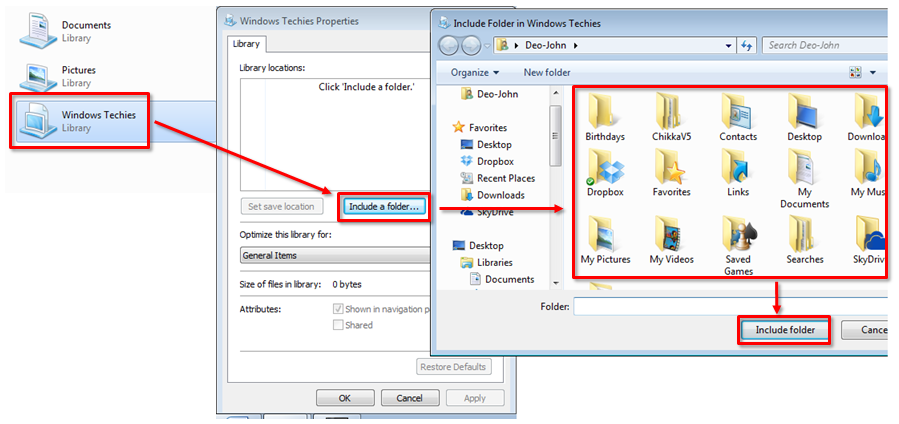
Another way of doing it is by right-clicking on the folder which you want to add contents to then select the “Properties” option. Next, you need to click on the “Include a folder” button located below the “Library locations” box then browse to the folder’s location and select the folder which you want to be included to the library’s contents then click on the “OK” button located at the bottom.
Why Use Libraries?
As explained above, libraries help searching of files easier especially those which are otherwise spread in different locations. For instance, you can combine several folders coming from different locations into one new library. This helps you easily access files and folders which are important to your work at home or in the office.
Another use of Libraries is when you have a HomeGroup turned on and you want to just have all the folders which you want to share in one location on your computer. By doing this, all the other users which are joined to the network will easily access all crucial files and not have access to the other ones which you don’t want to be accessed by anyone.
Libraries also helps remove clutters and other unnecessary stuff and organize it into one collection of files which can easily be opened and accessed without jumping to the different locations where these files are stored. If you’re not yet using the Libraries feature on Windows 7 then you need to learn how to do it so you can easily organize all the stuff that your Windows machine contains. If you’re having problems with any of the steps explained above on creating a Library on your computer please feel free to share them as comments on this article.