Using the Maps App
If you are a traveler, the Maps app will be a very handy tool which you can always check with when you are lost. Just like the maps app in other devices that runs in Android or iOS, the Maps app in Windows 8.1 works perfectly in guiding you to the right location where you want to get to. Using it isn’t that hard and accessing some features of it looks and feels the same with the Maps app in other mobile operating systems but of course, you will need some clear directions to help you get adept with every step which you need to go through. In this tutorial, we will be learning some functions of the Maps app and master some steps in using it so be sure to locate the Map tile on your computer’s Start Screen and follow the steps that I will show below.
Accessing the Maps App
Maps is one of the built-in apps in every Windows 8.1 machine. To open this very useful tool on your computer, you will need to access the Start Screen and look for the tile that represents the Maps app. Once you find it, simply click or tap on it and it will open in full screen just like any other mobile apps in Windows 8.1. The Maps app tile looks like the one on the screenshot below.
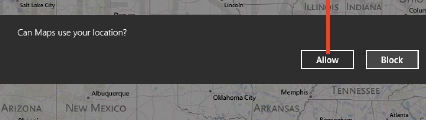
After doing so, there might be an on-screen instruction which will ask you if you would like to allow the Maps app access to your location or just block it. From here, simply hit the “Allow” button and the Maps app will open. From here, you can start exploring its built-in functions and features which will help you find your way anytime anywhere.
Zooming in and Zooming Out
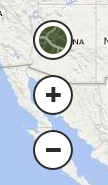
When you are using the Maps app, the default appearance on the screen look small but this is not permanent. You can make it look larger and have a better view on the other details by zooming in and make it smaller again to make it easier to point and go to other locations on the map by zooming out. This action is easily done using the “+” and “-” buttons found at the middle part of the screen’s left edge. The “+” button is for zooming in while the “-” button is for zooming out.
Switching the Map Style
The Maps app has two different styles for you to choose from and switching between these two map views is done easily with a click or tap on a button single button which is found at the top of the zoom in “+” and zoom out “-” buttons at the left hand portion of the screen.

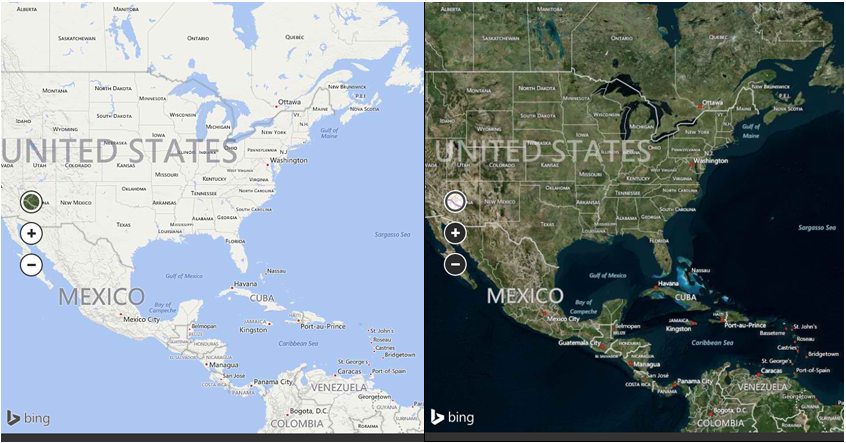
The screenshot below shows the two different map styles side by side each other. As you can see, the one found at the left looks like a plain map with labels of each location and is very similar to the one that you see on maps that are printed on papers. This is also the default map view that you will land on when you open the Maps app for the first time. On the right side, the map looks more realistic but some people prefer the default one because it is easier to read some labels and other map details when you are on the plain default map view.
Accessing the App bars
You can access even more options and functions of the Maps app by right clicking on it. Try it on your computer right now while the Maps app is open and you will see a set of options overlaid on two bars that are appears at the top and the bottom part of the screen. These bars contain some options that will let you navigate through the app and as well as switch between two locations easily. You can also mark a location by clicking on “Add a pin” and go to your location easily by clicking or tapping on the “My Location” option.

The top bar contains the “Map” and “Favorites” shortcut. Clicking on the one that is labeled “Map” will hide the App bars while clicking on the “Favorites” option will open all the locations which you marked as your favorite.
Searching for a Location
The Maps app in Windows 8.1 contains the Search feature perfectly integrated with it. You can use it to easily search for the places that you want to locate on the map. To use the search feature, simply enter the name of the place that you are trying to look for on the search input box located at the top-right portion of the screen.

You will also notice that when you click inside the search input box, the previous places that you searched for will all appear on a drop-down box. This will make it easier for you to access a place that you previously entered into the search input box as you can see on the screenshot above.
Getting Directions
Another feature that the Maps app offers is the ability to give directions when you are on a travel and you don’t know which way to go. You can use this feature by clicking inside the search input box and once the Search screen appears, you will need to click on the “Directions” link found on top of the search input box.

After doing so, the display on the search screen will change and show some options for the mode of reaching certain locations which is by a car or public transportation represented by the car icon on top or by walking represented by the walking person icon just beside the car icon. The default setting that is selected is the car icon.
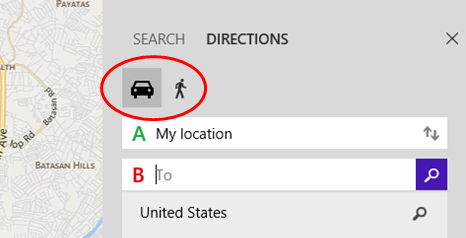
Next, just below the two icons for selecting your mode of transportation are two input boxes for where you can input your location of origin which is the first box labeled “A” and the point where you are going to which is the box below labeled “B”. To get directions to the location you are heading to. Simply input your current location into the box labeled “A”. If you enabled app to use your location, the input box “A” will already be filled with your current location from where you are using your device and all you need to do is input your destination to the input box labeled “B”.

After inputting the two required locations, simply hit the search icon located at the right portion of the destination or “B” input box. After that, the Maps app will then load the directions for a few minutes and will display the directions on the same screen just below the two input boxes. The map display will also show a blue line which is the route that you need to take as you travel from location “A” to location “B”. Just follow the directions given by the Maps app and you should be able to reach your destination without any getting lost.

That’s it! You now learned the essentials in using the Maps app in your Windows 8.1 machine. Take time to follow the steps above and before you know it, you’re already using this built-in app like a boss!