Windows 8: Working With the Mail App
Windows 8 is a new world than that which we all have grown accustomed with. The presence of apps, charms and other features which are not found in any of its predecessors makes it more useful and exciting to explore. Apps are a dominant feature in Windows 8 which is not found in its predecessors. In this tutorial, I’ll be showing the steps on how to set up the “Mail” app on Windows 8 and discuss the basic things that you need to learn to effectively use it in managing all your email accounts.
Setting Up Your Email
Unlike the older versions of the Windows operating system, Windows 8 has an efficient email app which is built-in with the system itself and is capable of being set up using Google, Yahoo, Microsoft accounts (Outlook.com or Hotmail.com) or any other email client. You can also set it up for an “Exchange” account if you are using one at your work for as long as the company you are working for has allowed accessing emails from an external location. If you used Windows 8 by logging in to it using your Microsoft account then the “Mail” app would already be linked to your account. If this is the case, you can add your other email accounts by following the steps below:
- Open the Start Screen then click or tap on the “Mail” app tile. Once it opens, simply pull up the “Charms” by pointing the mouse on the upper-right corner of the screen or if your computer has a touch-enabled screen, you can swipe from the right portion of the screen towards the center using your finger and the “Charms” will appear.
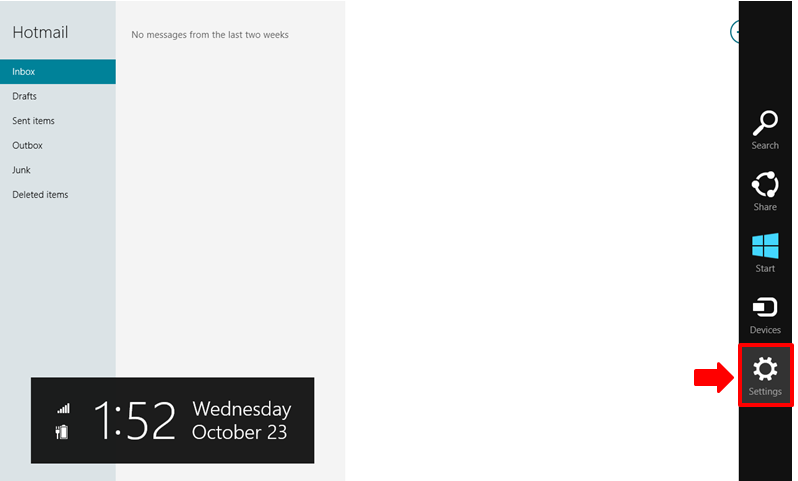
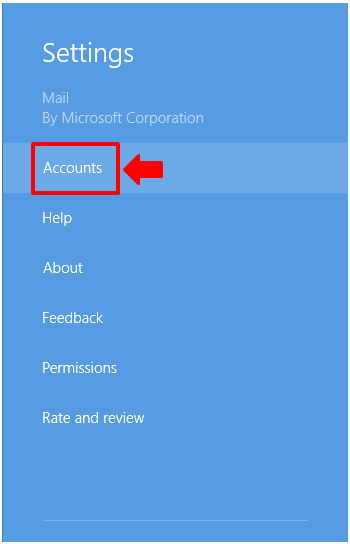
- From here, you need to click on the “Settings” Charm at the bottom and you’ll see the settings for the “Mail” app would appear. Once you see it, look for an option that says “Accounts” then click or tap on it.
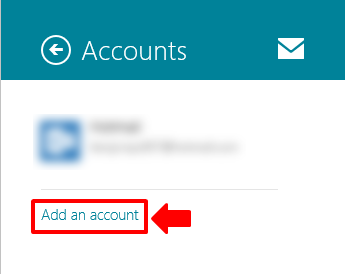
- After clicking on this option, you’ll see another screen where you would need to click “Add an account”. Above this link, you’ll see the list of other email accounts that are already linked to the “Mail” app and in this case, you’ll only see my Microsoft email account linked to it because this would be my first time to add another email account.
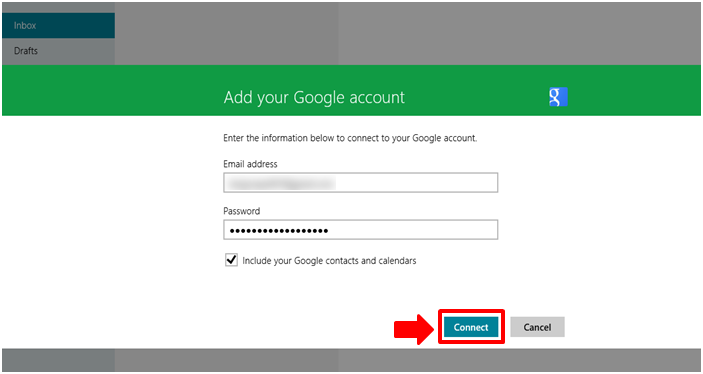
- The next screen will then allow you to choose which email client does the new account belong to. You can choose to add another Microsoft email and any of the other email providers on the list but for this example, I will use my Google Mail account and link it to the “Mail” app so I’ll click on the option that says “Google”.

- The screen that would follow will then ask for your Google Mail account credentials (Email address and Password) so that the “Mail” app can connect to it. You’ll also see a check box below the input boxes for the Email address and Password that says “Include your Google contacts and calendars”. If you want to enable syncing of these other stuff, simply put a check mark in the box by clicking or tapping on it. After inputting the required information, simply click on the “Connect” button at the bottom.
NOTE:
In some cases, the “Mail” app might say “Unable to connect” even after you input the right account details. If this happens, all you need to do is remove the check mark on the “Include your Google contacts and calendars” option and click or tap on the “Connect” button again and the “Mail” app should now be able to connect to your account.
After successfully adding another email account, you will then be able to access email contents through the “Mail” app. The screenshot below shows my Gmail account’s “Drafts” section.

Switching Between Email Accounts
After adding a new email account the Windows 8’s “Mail” app, you’ll notice that the account which you’ve added is the one that you see whenever you open the “Mail” app. To see the other email accounts, all you need to do is click on the name that corresponds to the email account that you want to open right at the bottom left corner of the “Mail” app screen.
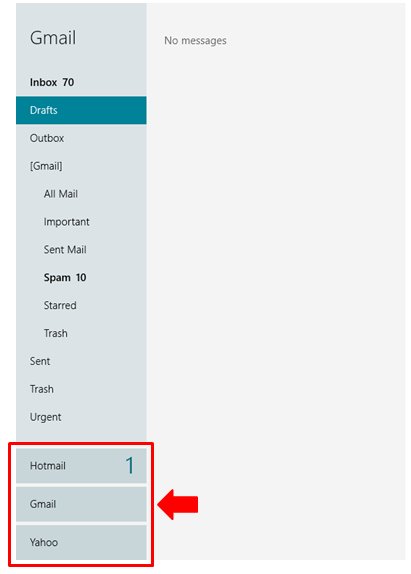
On the screenshot above, you’ll notice that there is a number on one of the email clients listed. This number indicates that there is a new email received on the account.
How to Remove an Email Account
Let’s say you already added a lot of email accounts into the “Mail” app and you want to remove one from the list. You can do so for any email account which you added to the list. However, the one that is linked to the Microsoft account that you used to log in to your Windows 8 computer can’t be removed since it is set automatically and is now the default email account for the “Mail” app. To remove an added account, simply do the steps below:
- First, you need to open the “Mail” app then access the “Charms” and click on the “Settings” Charm the same as you did in the first part of this tutorial and after doing so, you’ll be directed to the screen that lists all the accounts linked to the “Mail” app and as well as the “Add an account” link. From here, simply click or tap on the email account that you want to remove.

- After clicking on the email account that you want to remove, you’ll be taken to a screen that lists all the settings for the account. Simply scroll down towards the bottom of it and you’ll see a section that says “Remove account”.

- After doing so, the account will automatically disappear from the list of email accounts that shows on the list and you will not be able to receive emails from it when you use the “Mail” app. You can add it again anytime you want.
A Better Email Management App
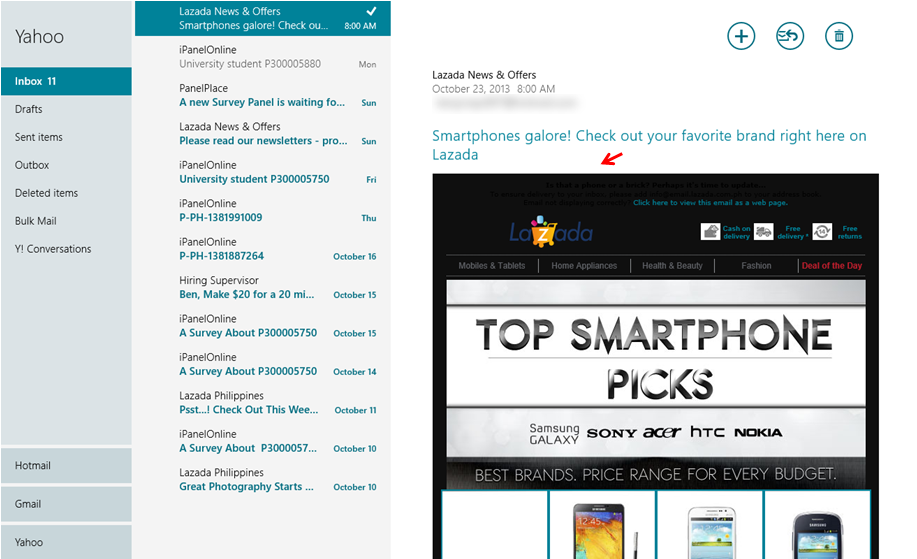
The “Mail” app on Windows 8 has got plenty of features that makes it very efficient in managing your email accounts. Unlike other email apps, the “Mail” app also shows every content of an email you received without compromising your security. On the screenshot below, you’ll see that one of the emails I received is from an online shop and it shows the pictures in it without the need of enabling a “Display images” option as in the case on other apps offered by other platforms.
As you can see, Windows 8’s “Mail” app is one useful tool that helps you manage all your email accounts in one place. When you start using Windows 8, learning how to configure this app is an important thing to master so you can stay connected with all your email accounts anytime. We will be discussing more of what Windows 8 has to offer on our next tutorials. For now, take a look at the email app and apply the things I’ve shown in this tutorial so you can start making the most of what Windows 8 has to offer.