Windows 8 Tiles: What are They?
Most of us are familiar with the desktop screen and the shortcuts that it contains and of course, some, if not everyone are even more familiar with the Start Button and the Start Menu on previous Windows versions. This is the reason why most Windows users were enraged of the Start Button and the Start Menu’s absence on Windows 8 but believe it or not, there’s a better replacement for these stuff which Microsoft has included on their new operating system version.
The features that I am referring to are more commonly called as the Start Screen and the “Tiles” that are pinned on it. Unlike the previous Windows versions, Windows 8 allows you to install not just desktop programs but mobile applications as well coming from the Windows Store. Isn’t it great? Having a Windows 8 machine is like owning two devices in one. In this tutorial, we will be looking at one of the brand new additions on Windows 8 called “Tiles”. These colorful rectangles and squares pinned on the Start Screen are indeed shortcuts but there’s more to them than what meets the eye. We will find out how they differ from the desktop shortcuts that we all got used to on Windows XP, Vista and Windows 7 and of course learn the basic steps in customizing them. Just read through to find out more about the Windows 8 Tiles.
Facts about Windows 8 Tiles
There has been a lot of rumors and speculations regarding Windows 8’s new features like the Start Screen and the Tiles pinned on it but nothing has really got close to explaining the real purpose of these brand new features. Since it took some years before Microsoft made quite big changes on the Windows operating system, users now are finding it hard adopting to Windows 8 and the Start Screen feature. Older versions of Windows have desktop shortcuts that are used to launch programs, files, folders and a host of other stuff and this has been carried over to Windows 8. However, there’s a brand new addition called Tiles. Windows 8 Tiles are found on the Start Screen and are used to launch not just desktop programs but as well as the Apps installed on your computer. Shortcuts and Tiles are used for some purpose that are similar to each other but it is important to know some features and capabilities that a Tile has which desktop shortcuts aren’t capable of doing.

Here are some things that distinguishes Start Screen Tiles from Desktop Shortcuts:
- Tiles work exclusively for apps and are only found on the Start Screen and not anywhere else.
- All are squares and rectangles in shape with the icons of the apps/program that it represents located inside the square/rectangle.
- They differ in color making them easy to spot and identify whenever you scroll through the Start Screen.
- Windows 8 Tiles can be resized to appear smaller or larger. For instance, if a tile appears as a small square, you can right-click or press and hold on it to bring up a bar at the bottom where you can choose to make it appear “Larger”. On the other hand, if you choose a tile that appears as a rectangle, the items on the bar at the bottom will give you the option of making it “Smaller”.

- Tiles can show real-time images and flash pictures depending on how it is designed.
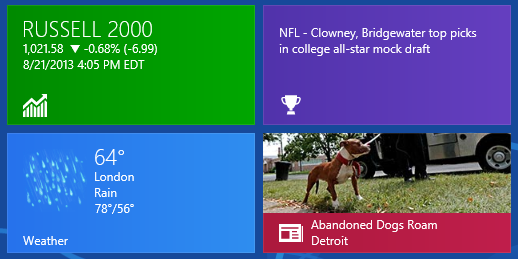
- Consider the “Mail” app for instance, you’ll see that it displays the subject of the latest mail that you received on your inbox and as well as the name of the sender. If unread mails are available, a bold number will appear at the bottom-right side of the tile.

- Desktop programs and applications as well as other things like folders, libraries, Control Panel items and a host of other stuff can be pinned on the Start Screen but they are just Shortcuts and are not to be considered as Tiles. Unlike Tiles, these shortcuts only show icons of the program, location or website they represent enclosed within a square. They will never have real-time pictures and moving texts within them.
- Tiles are arranged in a grid format so you can easily scroll through them from right to left and left to right using your finger if you are using a touch enabled device or using the scroll wheel of the mouse if your computer doesn’t have a touch enabled screen. You can also point the mouse on the left or the right corner of the screen to move through tiles and shortcuts pinned on Windows 8’s Start Screen.
How to Select Tiles
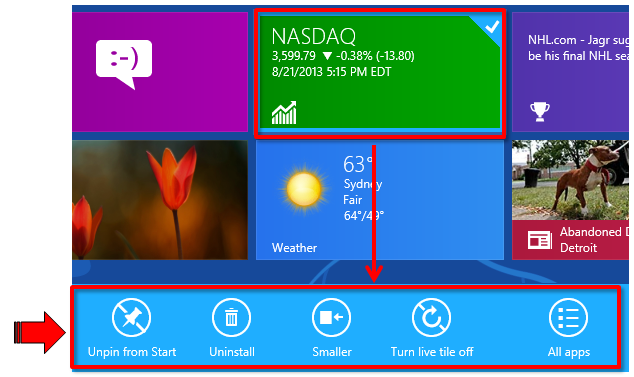
The very first thing that you need to learn before doing any customization steps on Start Screen Tiles is of course selecting them. There are limited gestures that are applicable on the Start Screen and working on it is a bit different that the Desktop. For instance, left-clicking or tapping on a Tile will open the application that it represents while right-clicking or pressing and holding any Tile will open the contextual menu located at the bottom of the screen within a bar. This gesture is also equivalent to selecting the App. Try selecting one Tile by right-clicking or pressing and holding it and you’ll see that a check mark will appear at the top-right corner of it. When this check mark appears, it means that the Tile is already selected and all the options that appear on the bar at the bottom are actions that would apply to the Tile you selected.
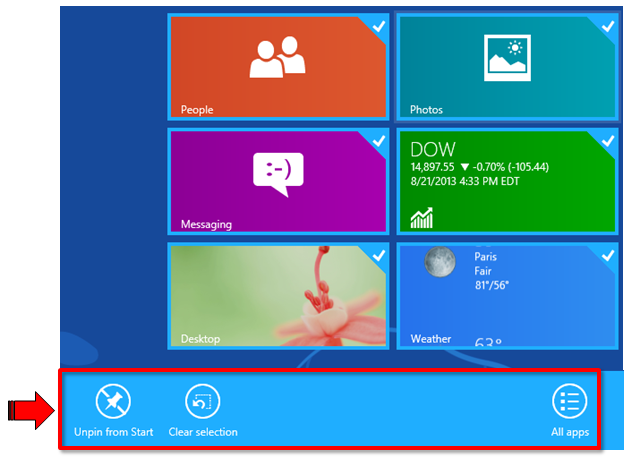
When multiple Tiles are selected, you’ll notice that the options on the bar at the bottom is fewer than the one shown above. This is because the Tiles that are selected have different settings and configurations so the options that appear are only the ones that are common to all the selected apps.
If you select a desktop application shortcut instead of a Tile, you’ll notice that there will be more options available within the bar at the bottom which is quite different from the set of options that appeared when you selected a Tile. This will always be the case when selecting pinned shortcuts because they work differently compared to Tiles.

Now that you learned how to select apps and shortcuts pinned on the Start Screen. It is time to learn what the options would do so you can customize a specific Tile and make it work the way you want it to.
How to Customize Tiles
After selecting a Tile, you’ll see some options that applies to it which you can easily execute by clicking or tapping on them. The names designated to each of the options suggests what each one does.
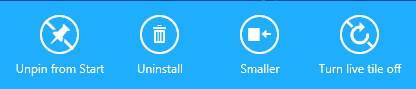
- The first option “Unpin from Start” will remove the Tile once it gets clicked or tapped. You can use this to free some space on the Start Screen and of course, remove some tiles that you don’t use at all
- The second option labeled “Uninstall” will completely remove an app from your computer.
- The third option on the list may say “Smaller/Larger”. If you selected an app that is represented by a small square Tile then this options should say “Larger” but if you selected one that is represented by a larger rectangle then the option should say “Smaller”.
- The last option that says “Turn live tile on/off” would enable or disable the real-time display of pictures or texts a a selected tile.
The tiles on Windows 8 are really wonderful new additions to the latest version of the Windows operating system. If you really come to think of it, Windows 8 and its features like Start Screen and Tiles are big improvements. Nowadays, if you have Windows 8, it is like you are carrying two devices within your laptop computer because the system not only allows installation of desktop programs but of mobile Apps as well which are available in Windows Store.