Windows Explorer Then, File Explorer Now
Windows Explorer is one of the most important part of the Windows operating system and it has remained to be so even in Windows 8. I am sure that you already used it plenty of times or in fact, almost every time you use your computer but to be honest about it, there are still a lot of things that you don’t know about this feature of Windows. In this tutorial, I will be showing 10 useful tips that will help you use the Windows Explorer feature in Windows 8 to the fullest but before starting with the tips, you need to know first that “Windows Explorer” is the name that we used to call it back in the days of Windows XP, Windows Vista and Windows 7 but now, the name has already been changed to “File Explorer”.
Why change such a familiar name? Well, only Microsoft knows the reason. The name might have been changed but its functions and the keyboard shortcuts that works with Windows Explorer still works in Windows 8’s “File Explorer”. It is just the name that changed but the looks, functions and how everything works in it are still the same. So let us learn the tips now.
TIP # 1 Select Multiple Items Randomly
Here is something that you might have not done or used yet even back in the days of the previous Windows versions. If you are using a keyboard, you can actually select several items at once in a random manner.

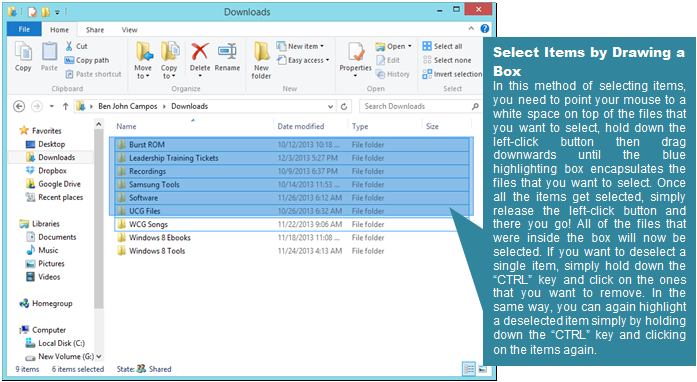
TIP # 2 Select Items by Drawing a Box
Another way of selecting items is by using the mouse to draw a box that will encapsulate all the files that you want to be selected. This might not be new to you if you are familiar with working on different types of Word documents but for the benefit of those who don’t know it yet, I will demonstrate it below.
TIP # 3 Select Items with the Shift Key
If you are trying to select some items on the which are arranged together, simply hold down the “Shift” key then click on the first item first and once it gets highlighted, click on the one at the last. After you do so, you will notice that all of the other items in between the first and the last one that you clicked will also be selected.
TIP # 4 Shift + CTRL + Arrow Keys
You can also select items using the “Shift + CTRL + Arrow Keys”. This is very useful helpful especially if you are not using a mouse
TIP # 5 Copy and Paste
You might be familiar of these commands but you should be aware that these are also available as keyboard shortcuts. All you need to do is select the files, pictures, folders or any other media that you want to copy into another location then once everything gets selected, simply right-click on any of the selected file and click the “Copy” option from the menu box that appears then navigate to the location that you want to copy the items to and right-click on an empty space in it then choose “Paste”.

TIP # 6 Remove the Original File
Another way of copying files from one place to another is by using the “Cut” command which can also be found in the right-click menu. Doing this removes the original file from the place where it used to be saved in and it is then copied to a new location. It functions the same as the move command. The keyboard shortcut for this command is “CTRL + X” to copy instead of “CTRL + C” then “CTRL + V” to paste the file to a new location.
TIP # 7 Use the Undo Command
If in case you deleted the wrong file, you can always take advantage of the “Undo” command. It is not available on the right-click menu but you can use it right away by using the “CTRL + Z” keyboard shortcut.
TIP # 8 The Send to Menu
On the right-click menu, you’ll also find an option that says “Send to” with an arrow that points to the right. Just hover the mouse pointer on this option and you’ll see all the locations where you can send a file to. You can also create a new compressed folder, move files to an external drive or email a file right away using this option.

Tip # 9 Drag and Drop Items to the Taskbar
You can drag and drop folders or program shortcuts to the taskbar so you can easily launch them without going to the place where you saved the files or shortcuts in. Doing this will also make launching some other stuff and saving files easily, just drag them to the program icon or the folder that is pinned on the taskbar to launch or save an item.
TIP # 10 Rename Files Easily
There are three ways in renaming a file. One is by right clicking on it and choosing the “Rename” option or by doing two slow clicks on it. If you want a shorter way to rename the stuff on your computer then simply select the file and press the “F2” button. This method is very handy especially if you want to rename a lot of files in a row.
More Tips Coming in Future Tutorials
So far, we have only discussed some basic tips that you can apply while working with the File Explorer feature in your Windows 8 machine but that’s not everything yet, there are still more to discover about this very useful tool so stay tuned on windowstechies.loc to get the latest tips applicable to Microsoft’s latest operating system, Windows 8 and Windows 8.1.