Working With Wireless Networks the Control Panel Way (Windows 10)
Since the release of Windows 8, negative comments and reviews coming from hundreds if not thousands of users from all over the world has spread like wildfire. Most of which are centered on the operating system’s big changes that were seen as too drastic for the less techie user who only knows and sticks with the most basic method in doing things. In our previous tutorial, we’ve talked about the ways in how you can manage available wireless networks in the new “Settings” Window that has been improved and made a lot better in Windows 10 compared to the version found in Windows 8 and Windows 8.1 but as we have pointed out, this modern “Settings” section doesn’t really have everything. It only acts as an instrument that seems to introduce users to the mobile environment of Windows 10 but aside from the basic stuff that it can open, all the rest are just links that lead to the “good old” Control Panel. So in order to help our readers go through Windows 10 like an expert, we have prepared this tutorial that would guide everyone through working with wireless and even wired network connections from the Control Panel.
How to Access the Control Panel Window in Windows 10
One of the reasons why users have been furious about the latest Windows editions including Windows 8, Windows 8.1 and Windows 10 is because of the changes made in accessing certain mainstay components of the operating system itself which includes the Control Panel. If you’ve experienced being confused in pulling up this feature in your Windows 10 machine then here are different ways in doing it.
Right-Click on the Start Button
The very first and probably one of the easiest way in pulling up the Control Panel Window is done simply by accessing the “admin menu” or “WinX menu”. To view this hidden menu on your Windows computer. All you need to do is right-click on the Start Button and after doing so, you will see a small box that will pop-out of the bottom-left portion of the screen which looks exactly like the one shown below. 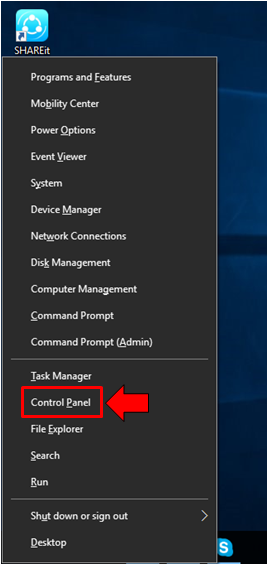 Once this hidden menu appears, all you need to do is click on the link in it that says “Control Panel” as highlighted on the screenshot above. You can also access this same menu by pressing the “Windows + X” keyboard shortcut combination. In case your computer doesn’t have the latest version of Windows 10, this “WinX menu” will be white instead of appearing dark gray as shown above but don’t worry, the same items and links will still be found in it so just look for the one that says “Control Panel” if you want to pull up the Control Panel Window.
A Shorter Method
Everyone loves shortcuts so if you’re in a hurry and you don’t want to be getting into other steps just to access the “Network and Sharing” section of the Control Panel Window then all that you need to do is head to the bottom-right portion of your computer screen (extreme-right end of the Taskbar) then right-click on the “Network Status” icon in order to pull-up two options as shown on the screenshot below.  Now, since our goal is to open the “Network and Sharing” section of the Control Panel instantly, you will need to click on the option which says “Open Network and Sharing Center” as highlighted below. After you do this, you should be able to instantly open the “Network and Sharing Center” section of the Control Panel.
 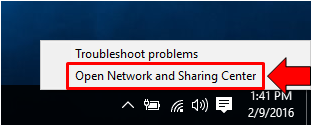 There’s really not much that has changed in the Control Panel that is found in Windows 10 except for some improved icons and other minor stuff which don’t really look intimidating to newbies or even long-time older Windows edition users. So now that we’ve already learned a couple of ways in accessing Control Panel, let’s now get started with the details involved in working with available networks (both wired and wireless) from the “Network and Sharing Center”. Let’s start with the basics.
Where is Network and Sharing Center Found?
In case you used the first method that we have shown above and landed you landed on the main Control Panel Window, all that you need to do is click on the “Network and Internet” link which is highlighted on the screenshot below in order to access the section where the “Network and Sharing Center” link is located.  In the Window that follows, you will need to click on the “Network and Sharing Center” link and voila! You’re now in the same Window that should have opened if you chose to use the second method that we have shown previously in the earlier part of this tutorial.
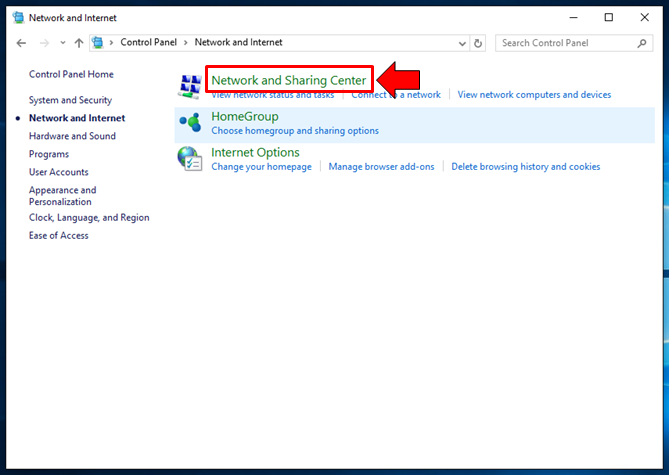
Viewing Your Network’s Current Status
Now that you’ve already learned how to access the “Network and Sharing Center” of the Control Panel in Windows 10, the next step is to find out how you can view the status of the wired or wireless network that you are currently connected to. This won’t really be hard because all that you need to do is click on the link that you’ll find at the right of the “Connections” label which says “Wi-Fi (Your Network’s Name)” as you can clearly see on the screenshot below. 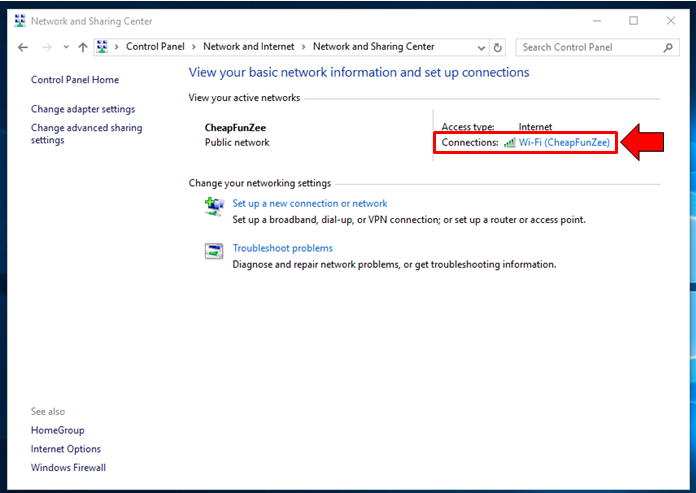 After this link is clicked, you will be able to pull-up a small window that will pop-out of the screen itself and is labeled “Wi-Fi Status”. From here, you should be able to see your network’s connectivity and activity. The small window looks like the one show below and just as you think everything is already done and explained, you’re wrong, there are still even more to discover here so just keep reading.
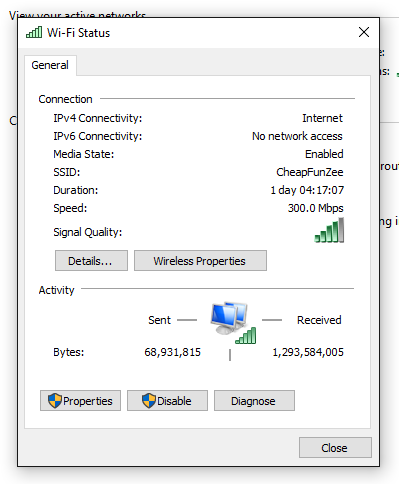
How to View Further Details About Your Network
The small Window which you have seen doesn’t really reveal everything about your network so you will need to go further and open another small Window which will now contain details such as IP address and other stuff. To open this small Window, you will need to click on the “Details…” button that is found on the “Wi-Fi Status” Window as you can see below. 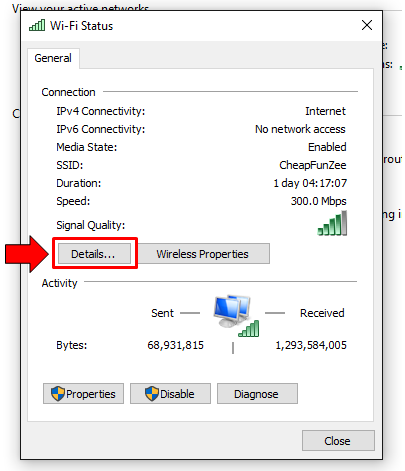 After you’ve clicked on this button, another small Window will appear which is labeled “Network Connection Details” and from here, you should now get further information about your present network connection. The information found here is important especially when you’re trying to troubleshoot a certain network connection in case it’s not been working properly these past days.
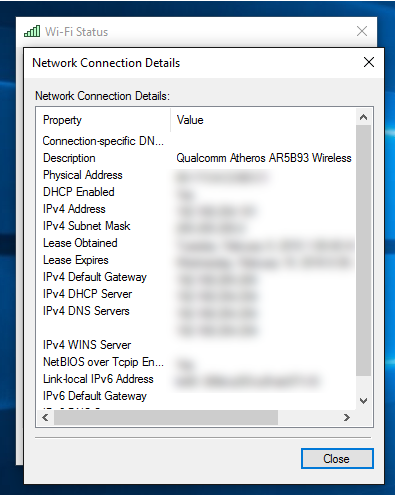
Viewing Other Wireless Properties
For wireless networks, there is still one more section that you need to learn about and it is called “Wireless Properties”. To be able to pull-up this section in your Windows 10 machine. All that you need to do is click on the “Wireless Properties” button that is found just beside (to the right) of the “Details…” button as highlighted on the screenshot below.  The small Window that will open after you click on this button contains two tabs which are “Connection” and “Security”. Under “Connection”, you will see information such as the “Name” and “SSID” of your Wi-Fi network as well as the “Network type” and “Network availability”. There are also some checkboxes at the bottom portion which shows 3 tweaks that you can enable as you can see below.
 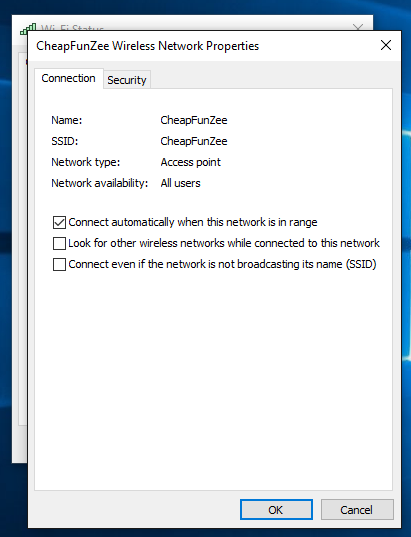 Next, under the “Security” tab, you will be able to get access or even change your network’s “Security type”, its “Encryption type” and as well as the “Network security key”. This is the section that you need to access in case you want to make some tweaks with your Wi-Fi password and manage other details.
 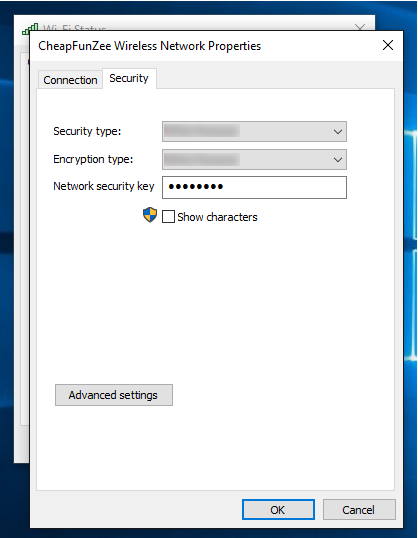 As you can see, working with your machine’s network connection from the Control Panel really gives more options and better view of different settings compared to doing it in the modern “Settings” Window as we have shown in our previous tutorial. Now, if you’re knowledgeable enough then you can also click on the “Advanced settings” button but if you’re not really confident in doing advanced tweaks and you’ve already done enough in the password, security type or encryption type then all you need to do is click on the “OK” button at the bottom and your changes will automatically be applied. Of course, you will be required to connect to the network again in case you have changed the “Network security key/password” in order to be connected to it again. Do you know of other ways in accessing the “Network and Sharing Center” in Windows 10 or you have a software that you can recommend that will help Windows users change wireless network settings easily? We’d like to hear from you, make yourself known to our community of readers simply by posting your ideas as comments below.