Getting Familiar with OneDrive Settings
OneDrive is not only your ideal cloud storage but is also a tool that will help you sync settings, files and other Windows 8.1 stuff to all your other Windows 8 or Windows 8.1-based devices and even those which runs in other operating system platform. Gone were the days of bringing a portable storage devices which bears your important files because you can now store it in a safe location which will allow you to download any of your stored contents anytime into any device. This surely sounds comfortable but there’s even more to the OneDrive cloud storage service than what you already know and that’s what we will be talking about in this tutorial.
Accessing the OneDrive Settings Section
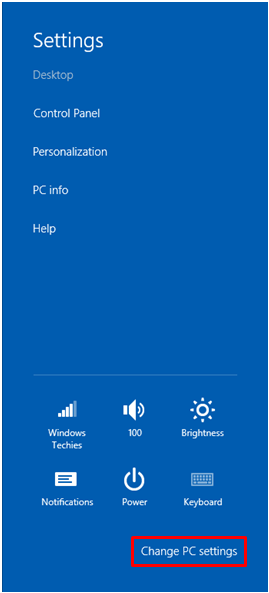
Just like the other built-in Windows 8.1 features and tools, OneDrive’s settings can also be accessed from the “PC settings” section and in case you’ve been used to the older Windows versions and don’t have an idea of how to access this location, you can simply press the Windows+I keys to access “Settings” metro screen and after doing so, simply click on the “Change PC settings” tab that is located at the bottom.
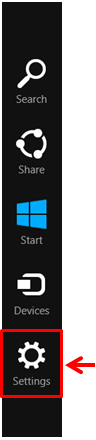
Another way in accessing the OneDrive settings section is by using the Settings charm. To do this, simply press the Windows+C keys or point the mouse cursor into the top or the bottom-right corner of the screen the drag it slowly downwards. After you do any of these two gestures, you should be able to see the Charms bar that will appear from the right-edge of the screen. From this bar, simply click on the icon that is labeled “Settings” and you’ll be able to get access to the Settings screen as you did earlier and from here, you can now click the “Change PC settings” tab at the bottom.
Lastly, the quickest way in accessing the OneDrive settings section is by using the Search feature which is perfectly integrated to the Windows 8.1 operating system itself. To access this feature, simply press the Windows+S keys and after doing so, you will see the Search screen that will appear from the right edge. From here, just enter the words “Sync settings” into the search input box that is provided and wait until the search results appear right underneath the input box.
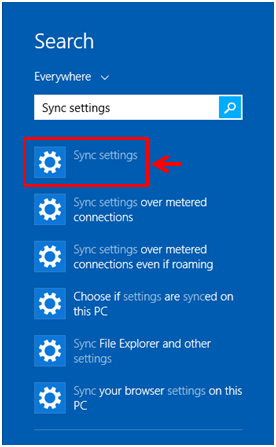
Now, from the search results that appeared, you will need to click on the one that says “Sync settings” which is the very first item on the list of results as shown on the screenshot above and you will be taken directly to the “Sync settings” of the OneDrive section in PC settings.
What’s Under the OneDrive Section
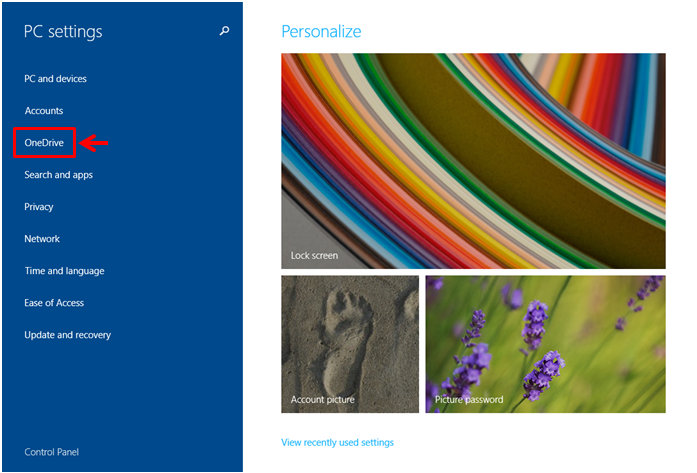
Now, when you arrive on the PC setting metro screen, you will need to click on the link that says “OneDrive” which you can find on the navigation pane at the left portion of the screen as you can see on the screenshot below.
On the screen that will follow, you’ll be able to access another unique set of links from the same navigation pane at the left which includes “File storage”, “Camera roll”, “Sync settings” and “Metered connections”. From here, let us try to look into all of the items that are on the navigation pane so we can get more familiar with the settings that are available for OneDrive.
File Storage
After clicking on OneDrive from the PC settings metro screen, the next one that will follow will show the “File storage” section. There’s really not much tweaks that you can do here but you will see how much space is available in your OneDrive storage and as well as a button that says “Buy more storage” just in case you’ll need more at any future time. There is also a switch for turning the automatic syncing of documents to OneDrive on or off and lastly, there’s a link at the bottom which will allow you to view your files that has already been uploaded to OneDrive.

Camera Roll
Next to the “File storage” section is the one that says “Camera roll” and as the name itself suggests, it contains all the photos that you took with your computer’s webcam or built-in. Try clicking on it and you’ll be able to access the settings for the section itself which includes options for uploading photos as well as a switch for turning automatic upload of videos to OneDrive on or off.

To learn more about the steps in using the Camera app which contributes photos into the “Camera roll” section, you can read our tutorial that explains all the things which you need to get through in taking pictures with the Camera app and even editing the photos that you took with it.
Sync Settings
This section contains the most important aspects of OneDrive because it allows you to customize how stuff are being synced into your OneDrive account towards all your other Windows 8 and Windows 8.1-based devices. Click on it and you will be able to access a lot of switches which are all categorized accordingly. The very first item is labeled “Sync settings with OneDrive” and under it is toggle switch which is labeled “Sync your settings on this PC”. Turning this switch on will allow all your settings to be synced with your other devices which will give you the feel of using one and the same computer even when you’re really using different machines every now and then.
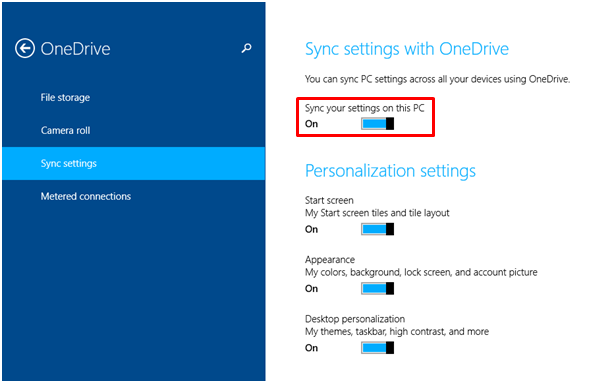
Next are the “Personalization settings” section which deals specifically with what you would really like to sync with your other Windows 8 or Windows 8.1-based devices. This includes the “Start screen”, “Appearance” and “Desktop personalization” as shown on the screenshot above. The next section is labeled “App settings” and it contains two toggle switches which are labeled “Apps” and “App data”. Each of these switches have good descriptions so you won’t really find it hard understanding what each one of them is for.

The section that follows is labeled “Other settings” and it includes other crucial settings such as “Web Browser”, “Passwords”, “Language preferences”, “Ease of Access” and “Other Windows settings”. Again, you will find descriptions for each one of them so be sure to read each one before turning it on or off and lastly, next to the “Other settings” section is one that says “Back up settings” and it only has one toggle switch that will turn automatic back up of your PC settings on or off.
Metered Connections
Finally, the last item under the OneDrive section of the PC settings metro screen is the one that says “Metered connection”. Try clicking on it and you will be able to access switches for turning on the options which will tweak the way how OneDrive works with metered connections. Take time to read on each of the descriptions for each switch before doing some changes to avoid any problem that could arise because of careless changes done to any default settings.

As you can see, the OneDrive cloud service is really an awesome tool and the good thing about it is it’s offered free to all Windows users. You can also choose to download and install OneDrive on your other devices that runs in a different operating system platform making it even an even better tool that has ever been offered for free by Microsoft!