How to Transfer Windows 8 Installer to a USB Storage Device
Installing Windows 8 is pretty easy if your computer has a DVD drive but what if the drive is broken or you’re using a device that does not have one? This can become a serious problem for people who don’t have the techie mindset within themselves. If your Windows 8 installer is saved on a disk or is on ISO format and you want to install it on a device that does not have a disk drive like a netbook then you really need to save it on a different storage media so you can use it for installation.
This would not be a problem at all if you have a laptop or a desktop computer which both includes a disk drive but for the smaller type computers, you need a portable DVD-ROM in order to use a disk for installing any operating system to it and the problem comes in if you don’t have one and purchasing it just for a single installation would be quite impractical. Borrowing from a friend would be another solution but what if you don’t find one who owns the device?
The good news is Microsoft offers a free software that would help you transfer all the installation files into a USB device. Yes! your problem is already solved since all computers have a USB port where you can plug any USB storage device into. All you need to do is to secure a USB or what is commonly known as a flashdrive and learn the steps which we will be discussing shortly.
In order to save the installation file into a flash drive, you first need to download the Windows 7 USB/DVD Download Tool to help you in the saving and transferring process of the installation files. You might be wondering why the software’s name says “Windows 7” and we’ll be using it for Windows 8. You don’t have to worry at all because the name doesn’t necessarily mean that it will work only for Windows 7 but for Windows 8 as well. You would also need a USB flashdrive with at least 4GB of storage capacity to provide enough space for the Windows 8 installer files to be saved in it.
Note:
If you will be using a flashdrive that already has files saved in it, we recommend that you save all of its contents to another computer first before you proceed because this process will erase all of the files saved in it.
1st Step: Create an ISO File
The very first step that needs to be accomplished is creating an ISO file of the Windows 8 installer. This is the easiest way of copying the installation files from the DVD disk to your USB storage device. If you downloaded an ISO version of the Windows 8 installation file then you’re good to go but if you bought the DVD version then you would need an application that would help you create an ISO image of the DVD and transfer it to the flashdrive.
To find an application that you need for this step, just open any search engine like Google or Yahoo then type “ISO file creator” and press the search button. There will be lots which will be listed on the search results and everything works basically the same so you can choose any brand that you like (I usually use powerISO for this purpose).
2nd Step: Download Windows 7 USB/DVD Download Tool and Install It
The next thing that you need do is to download Windows 7 USB/DVD Download tool. To search for the site from where you can download it. You need the help of a search engine again. To do this, you just need to type “Windows 7 USB/DVD Download tool” on your favorite search engine and choose a link from the search results so you can be directed to the site where you can download it (preferably from Microsoft’s official website). This software is offered free and you can download it from Microsoft’s official website as well. Once the download completes, all you need to do is browse to the setup file and run it.
3rd Step: Copying Windows 8’s Installation Files to the Flashdrive
The third step would probably take quite a longer time that the first two steps that we discussed above. Just follow the steps below to do the process:
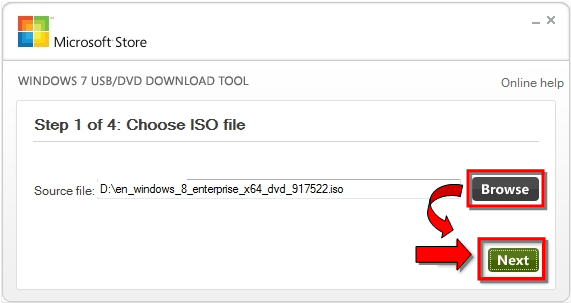
- Once the tool gets installed on your machine, you then need to plug your USB storage device/flashdrive to any of the USB ports available on the computer that you’re using then launch the tool. Once the tool opens, you need to browse to the ISO file that you’ve created in the 1st step then click on the “Next” button on the lower-right side of the software Window.
Note:
Inspect and ensure that the USB Flashdrive is connected properly to the USB port of your computer and make sure that your computer is able to detect that it is connected. Also, you need to make sure that it has at least 4GB or more storage capacity and be reminded that all files in it will be deleted during the process so it is best to save a backup of all the files that it contains to avoid data loss.
- The next Window will prompt you to choose to which device you want to copy the files into. From this Window, just choose the “USB device” button by clicking on it.

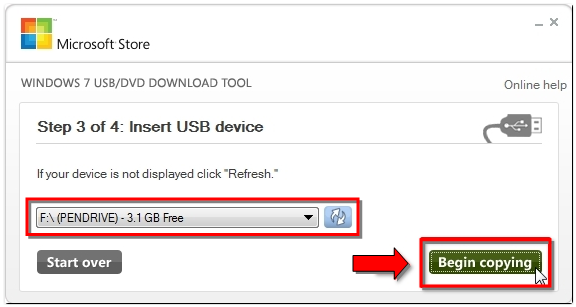
- The Window that would follow will give you a list of all the USB Storage device which are plugged to your computer. If you only plugged one device then you should only see one on the list but if you have more than one device that is plugged to your machine then you need to identify the right one, choose it then click on the “Begin copying” button at the bottom-right corner of the software Window. You can also click on the “Refresh” button if the device is not showing up on the list.
- Windows 7 USB/DVD Download tool will then proceed with the process of formatting your USB Storage device, making it bootable and copying the Windows 8 installer files to it. The whole process normally takes several minutes to complete and once it starts, you should never do anything that would interrupt the process like unplugging the storage device or turning off your computer. If you are using a laptop or a netbook that has weak a battery, you need to plug it to a power source to avoid the process from being interrupted. You will know that the process is already complete once the progress bar indicates that it is already 100% and the you’ll also see a message that says “Status: Backup completed” just below the progress bar.

That’s it! You now learned the steps in transferring an installer file to a USB storage device. This process works for any other Windows operating system installation file which you want to move into a flashdrive for it to be used on smaller computers. Take note that if the computer which you want to install an operating system into does not have an existing one installed on it then you need another computer to help you with the process that I described above but if there is an existing OS installed on the machine then you can use it with the above process and just install Windows 8 to it once you already have the installer saved on a flashdrive. It is also possible to have two operating systems installed on your computer. To learn how to do this, just read “How to Dual Boot Windows 7 and 8”.