Manually Updating Windows 7 Hardware/Device Drivers
Owning a computer exposes you to common problems that may lead to more serious ones if not given ample solution right away. A slow computer for instance commonly occurs when viruses and other forms of malware start infecting different areas of your machine. Useless processes and programs can also make a computer sluggish due to lack of system resource but what most people don’t know or even ignore is the aspect that involves drivers.
Outdated hardware/device drivers commonly cause weird behavior on your operating system. Often times, these outdated system components summon error messages and make them appear on your computer screen. Since device drivers serve as translators and communicators between your operating system and the hardware itself, an outdated or missing one may cause problems and give you very poor performance and inaccessible features. This is the reason why your computer has been behaving weird these past days.
Now, the question is how will you update these components? Installed programs like an Internet Security Suite can be set to update automatically but hardware and device drivers do not work that way. To update them, you need the help of a specialized software more commonly known as a “Driver Updater” but acquiring it entails money. Free and trial versions are available but they are limited to just identifying outdated drivers and you need to purchase license in order to enable driver updating. Thankfully, you can do the update process manually on your Windows 7 machine. To discover the steps in doing this crucial performance maintenance task, just follow the steps below:
How to Manually Update Windows 7 Device Drivers
Updating your computer’s device drivers is very important so you can be sure that you are getting all the features and performance of the hardware components which you paid for when your purchased your machine. It also protects you from major disasters that can come as a result of the conflicts within your system which are caused by outdated drivers. Below are steps in manually updating device drivers on your Windows 7 computer:
1. First, you need to identify the driver that causes weird behavior on your machine. You can do this by reading on the error message that appears occasionally which comes from the Device Manager. If there are no error messages, you need to take note of the process or system component that has problems. For instance, if the problem is on your wireless network then it means that the driver for the WiFi network adapter needs to be updated. Once you identify the culprit, you need to learn the manufacturer by going to the “Device Properties” section from the Device Manager. If you don’t know how to do this, just read this previous tutorial (Checking for Outdated Device Drivers (Windows 7 and 8)). Once you identify the manufacturer, just go to its website and search for the latest driver that is compatible to your device and the version of your computer’s operating system
Note:
Device manufacturers develop some drivers that has an integrated software which will let the driver be installed automatically on your computer by just running a setup.exe file. If you found a driver like this one, you can skip all the other steps below.
2. After downloading the driver, you need to save it in a location where you can easily find it. Taking note of its location will also be useful as you will see later. If the driver is in a ZIP or compressed format, you first need to extract it and afterwards, open Device Manager.
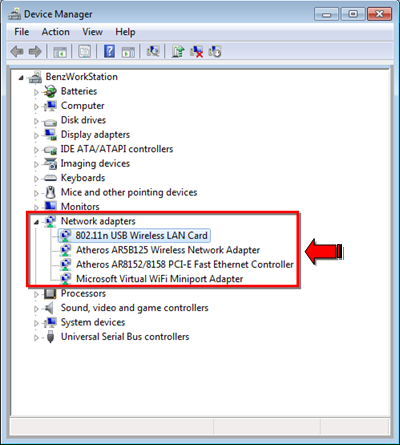
3. On the Device Manager Window, you need to search for the device which you want to update driver for. Searching for the device requires you to identify the right category and expand it by clicking on the (>) button on the left side of each category. On the example I gave above, the right category would be “Network Adapters”.
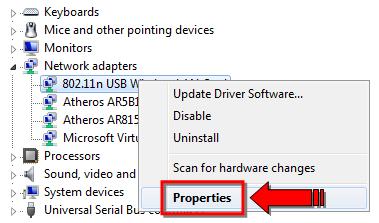
4. After finding the right device, you need to right-click on it and choose “Properties” from the menu box that would appear.
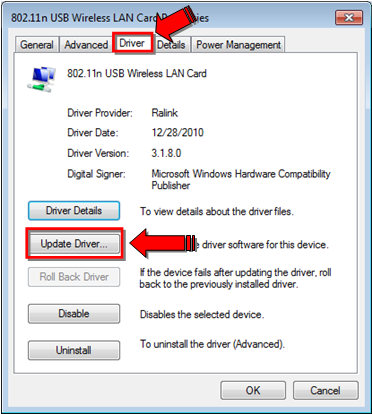
5. On the Device Properties Window, you need to click on the tab labeled “Driver” in order to see the details of it an identify its present version and release date, you will also know the name of the hardware/device manufacturer from this Window. To start the Update Driver Software Wizard, you need to click on the “Update Driver…” button as shown on the screenshot below.
6. Once the Update Driver Software Wizard appears, it will ask you “How do you want to search for driver software?”. Just select “Browse my computer for driver software” once you are alerted to do so.

7. On the Window that follows, just click on the link that says “Let me pick from a list of device drivers on my computer” located at the bottom.

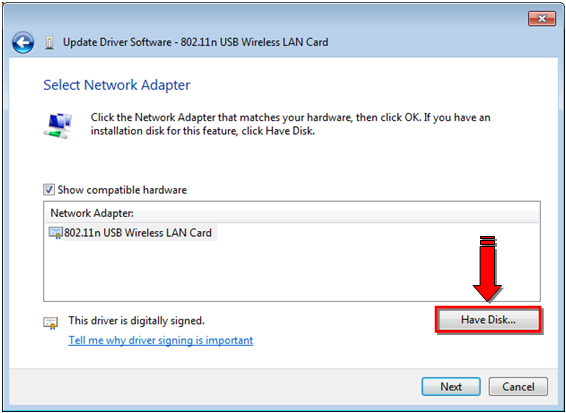
8. The next Window looks exactly as the screenshot below. From here, you need to click on the “Have Disk…” button located below the input box.
9. The “Install From Disk” dialog box will then appear where you can find a button labeled “Browse…” which will let you find the driver file which you downloaded and extracted in Steps 1 and 2.
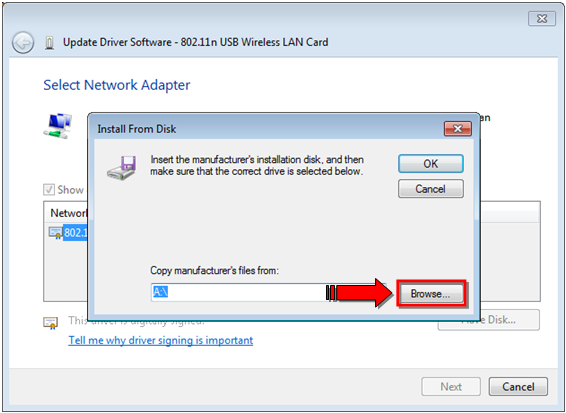
10. After clicking on the “Browse…” button, the “Locate File” Window will then appear which will let you browse towards the location of the driver file. Take note that you need to click find the INF file within the driver file you downloaded. The INF file contains instructions that will be read by the Wizard to complete the installation. If you don’t find this file, just follow the tips below:
- If you don’t find the INF file in any of the folders, it is possible that the driver file is corrupted and in this case, you need to download the driver again from the manufacturer’s website and extract it on an easy to locate place within your system
- If you don’t find the INF file on the main folder try looking for it in the subfolders that are available inside it.
- If multiple files are available just choose each one of them until you find the last one for the exact one that is compatible for your hardware/device.
11. After finding the right folder and the exact INF file, you need to select it and on the “Install From Disk” dialog box, just click on the “OK” button. Just follow all the on-screen instructions that comes after and when you see a warning message telling you that the driver might not be compatible to your device, just ignore it and click on “Yes” to proceed with the process if you are sure that the driver came from the manufacturer’s website. Windows 7 commonly does not certify drivers but they are still safe to install for as long as they came from a verified source or the manufacturer’s website.
12. After clicking on “Yes”, the Update Driver Software wizard will follow the instructions on the INF file. From this point forward, just follow all on-screen instructions to complete the installation.
13. Once the driver gets installed successfully, you need to reboot your computer even if the system does not tell you to do so. This is important to ensure that all changes will be applied. Driver updates commonly bring changes on a computer’s registry files which is why a reboot is needed so all changes can take effect. If the update causes problems after reboot, you just need to “Roll Back” all driver changes to restore your machine back to the condition before the driver update was done.
That’s all there is to it. If you encountered any problems on the steps described above just feel free to post them as comments on this tutorial.