Quick and Easy Tips for Customizing Your Wireless Network
Previously, we’ve learned how to change the default Username and Password which are both needed in accessing the web interface of your WiFi router and also went through the steps needed in finding out a router’s IP address if the default one has already been changed but that’s not everything yet. Your wireless network can still be hacked if it is still on its default SSID and a network password is not set for it. There are still a number of tweaks to a router’s settings that you need to learn if you really want to make it secure against unauthorized access and that’s what we will cover in this tutorial so be sure to turn on your WiFi router and connect your Windows 8.1 machine to it then follow the tips that I will be showing below.
Setting Up a Password for Your Wireless Network
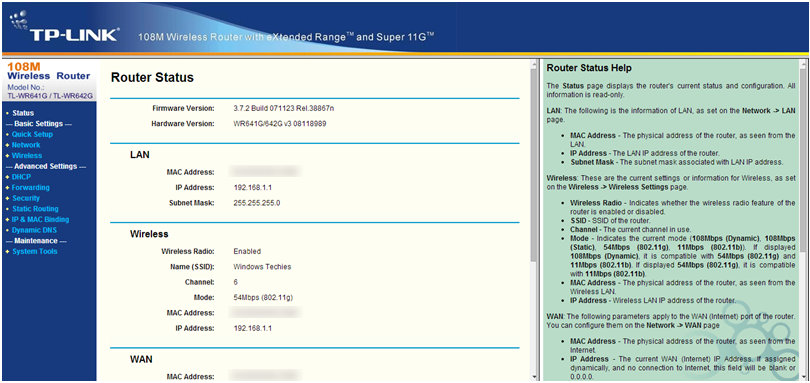
A brand new router would have no password at all when you first use it and it would bear the name of its brand as its SSID but it doesn’t have to stay the same because you can actually change these settings of your router in a few simple steps. First, you will need to access your router’s web interface. If you still have no idea of how this is done then you can refer to our first tutorial for the wireless network series which details the steps in accessing the web interface of a WiFi router. Your’s might be of a different brand than what is shown on the tutorial but every settings and controls on different router web interfaces are just the same so you shouldn’t be encountering problems at all. My router’s web interface is shown on the screenshot below.
Once you’re able to access your router’s web interface, you will need to click on the settings that is labeled “Wireless” which can either be on the left or at the top portion of it. For the brand and model of router that I am using, all of the settings and controls for it are located at the left so I just looked for the link that says “Wireless” and I clicked on it. The settings under this link then opened on the main screen. From here, you may look for the section for “Wireless Security”. In most routers, you will find a tick box for enabling wireless security so all you need to do is turn it on by clicking inside the small box.
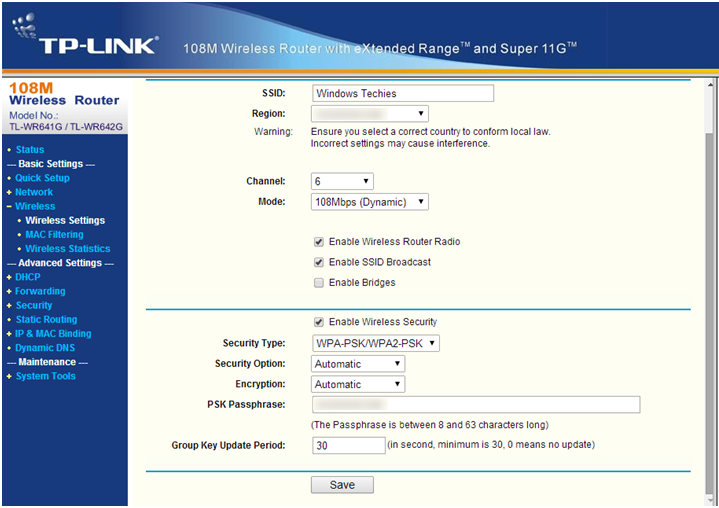
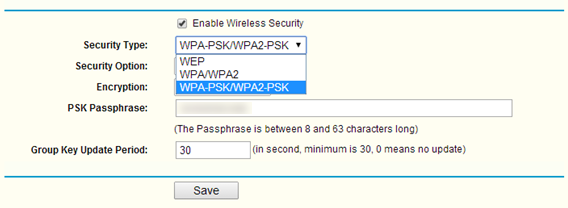
Next, when “Wireless Security” is turned on, you will need to select the “Security Type”. I recommend that you choose WPA/WPA2 or WPA-PSK/WPA2-PSK instead of WEP because it is more secured and allows a combination of upper and lower-case alphabets as well as numbers to be set as network password. To choose a security type, simply click inside the box provided and some options located on a drop-down window will appear. From here, simply click on the security type of your choice and all the other boxes for adjusting the wireless security settings will appear.
Different router brands have different web interface layouts but all functions are essentially the same. After choosing the security type that you want, it is time to assign a password. If you chose WPA-PSK/WPA2-PSK then you will need to enter the password on the “PSK Passphrase” box as shown on the screenshot above (the box having a blurred content for my network’s security). Once you are done, simply hit the “Save” button.
REMEMBER:
Other routers will require a reboot after changes are made to its settings and properties. While some reboot automatically after you click on a button or link that appears on the screen after you save the changes, others require manual reboot either from the web interface or by unplugging it for at least a minute the plugging it back in. The golden rule is just to follow the instructions shown on the prompt that appears after you save the changes you made.
Connecting to the Network
After you set a password to your wireless network, you will notice that your computer will automatically be disconnected from it. To reconnect to the network, all you need to do is click on the network status icon located on the system tray at the bottom-right side of the screen. Once the network status screen appears, simply click on your wireless network and wait until you are asked to enter the password.

After entering the password, you will need to click on “Next” and select between the “Yes” or “No” button on the option that will ask you if you want to enable sharing on the network or not.
Changing the Network Name/SSID
SSID or “Service Set Identifier” is the technical term used for your wireless network’s name. In brand new routers, the SSID might bear its brand name and as well as the model number but this aspect should not stay the same. You can actually customize it so it will look and sound unique among the rest of the networks available in your neighborhood. To change the SSID of your WiFi router, you will again need to access its web interface and once you are on it, simply hit the “Wireless” link as you did earlier when you changed the password. The section for the SSID should appear on top of the other options that are available under the “Wireless” section as you can see on the screenshot below.
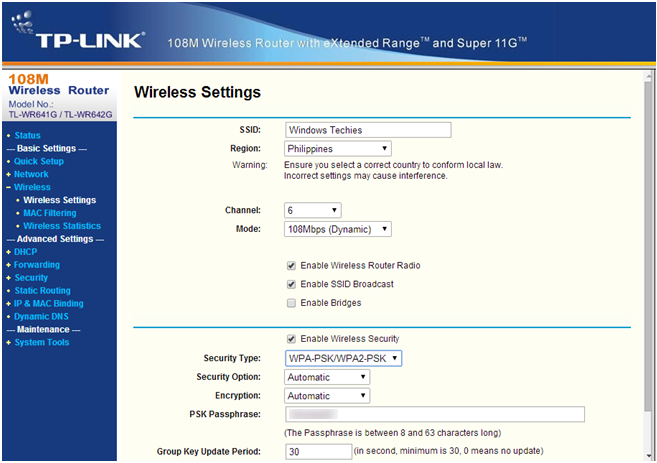
As you can see, I have already changed the SSID of my network to “Windows Techies”. On your router, you can also change it to another name and even include symbols and numbers to your network’s SSID. This helps in making your network more unique and can easily be identified among the rest. The SSID is what you will be telling to the people who wants to connect to your network aside from the password. Once they know what your network SSID is, they will be able to know which one to click and enter the password for and finally be connected to it.
TIP:
If you don’t know what the labels and terms on your router’s interface are all about, you can have a quick look at some definitions of the terms at the right side of the web interface. TP-Link routers have this important section in their router’s web interfaces so as to guide novice users in what to do. If you really don’t have any idea on what you should do on the web interface even after reading some of the definitions on the right hand portion of the screen then it would be wise for you to ask assistance from someone who has the right knowledge in networking. Doing this will help you to get rid of problems that can damage your router. For minor damages, the “Reset” button would work in restoring the device to the factory-set values and settings but for advanced firmware problems, the only solution for you is to buy a new router and dispose the old one.