How to Use the System Recovery Options in Windows 7
Windows computers are vulnerable to different kinds of threats that can hinder users from enjoying all the features that it has and the worst is when serious problems arise and your machine refuses to boot and even display the Windows splash image. Problems on your machine have variety of causes but Windows has some handy solutions to this which is included in the “System Recovery Options” tool. In this tutorial, you will learn what causes errors on Windows and as well as find out the possible solutions to system problems which are included in “System Recovery Options”. You’ll also find out how to open this tool from the Windows 7 DVD installer or from the hard drive itself. Just read on to find out how these things are done.
What Causes Windows Problems?
Almost all Windows versions which are still used today (Windows XP, Vista, Windows 7 and Windows 8) suffer problems which may have different causes and just like any other stuff, it is always good to prevent these causes rather than treating the effects.
Errors and other operating system problems on Windows are mostly blamed on viruses, malware and other malicious software but there are also other causes that we ourselves create. Below is a list of these causes:
- Registry Errors- Experts say that 90% of computer problems that users suffer are caused by errors in the registry. Think of the registry as the brain which governs your computer’s every move containing entries that help programs and other software to work peacefully with each other. If errors exists your computer may start to have programs which are not functioning, pop-up notifications telling you that an error exists, poor performance and ultimately the dreaded blue screen of death error.
- Improper Shutdown- All of us know how to properly shut down a computer but when power outages happen or we run out of battery power, the machine just shuts down by itself causing problems when you turn it on again.
- Fragmented Registry- When registry entries are scattered, your machine’s CPU takes more time and resources to execute basic tasks causing a significant decrease in performance. This is most common if the computer is used for a lot of tasks each day
- Viruses and Malware- These culprits are well known for causing a lot of serious problems on Windows and the risk of getting problems caused by these devils increases if you don’t protect your machine with a good virus protection software.
There are still plenty of other causes that I can give but I will just leave you with these most common ones and reserve the rest for a future tutorial.
What are System Recovery Options and When Can You Use Them
Windows System Recovery is composed of five tools which are geared to helping you repair and as well as recover from problems that caused your machine’s operating system to become unstable. These five tools are as follows:

1. Startup Repair
You can use this tool when your computer refuses to start correctly. Startup repair scans for missing or damaged system files that prevents Windows from properly starting up. This commonly happens after you did something which altered important system files like installing applications and updating drivers resulting to modified system files which are involved in Windows startup.
2. System Restore
When Startup Repair doesn’t work, you can use System Restore and revert all system files back to a working state using a restore point that Windows automatically saved before problems happened or one that you manually created. Performing a System Restore process does not affect the files that you have on you hard drive so it means that all your important files that you saved before problems started to occur will still be intact even after a system restore process is done. To learn more about the System Restore process, just read our article on “How to Use the System Restore Tool (Windows 7 & 8)“.
3. System Image Recovery
This would be the next available option if the first two options didn’t help. This works by restoring your system back to the system image specified but of course, you need to occasionally save an image when needed so you can have something to use in performing this process. The drawback with this is that it will just revert the applications, folders and files that are available on the system image used.
4. Windows Memory Diagnostic.
If upgrading, replacing or tweaking your computer’s RAM modules causes your machine to freeze or refuse to boot normally then scanning its memory for errors would be a big help. Windows Memory Diagnostic is also a big help in detecting errors or identifying if your computer’s memory needs to be replaced.
5. Command Prompt
A window that contains a black screen which can be used by advanced users to perform some operations related to system recovery. Take note that it is only for advanced users and if you use it without proper knowledge of how it works then you can end up in a worst scenario than before.
How to Access System Recovery from Windows 7’s Installation Disk
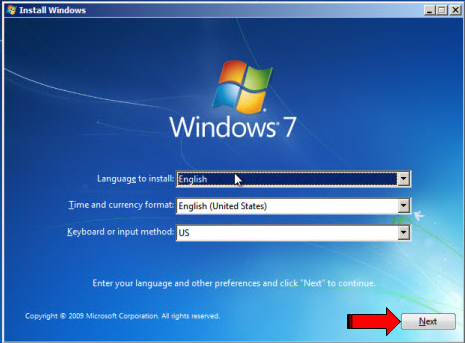
To perform this process, you need to secure a Windows 7 installation disk and insert it to your computer’s DVD drive. Make sure that the DVD drive is set as the first device in the “Boot Device Order” and once everything is set up, you can press the power button on your machine to turn your computer on. Once it turns on, you would arrive at a screen that asks you select your preferred language. Select your language and press the “Next” button.
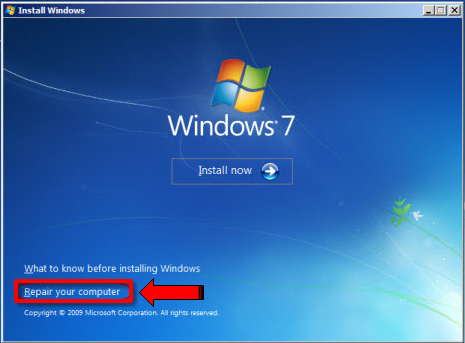
On the Windows that follows, click on the “Repair your computer” link.
The next step will require you to select the operating system that you want to repair. If you have two or more operating systems on your machine then you need to select the one that is damaged and click on the “Next” button.

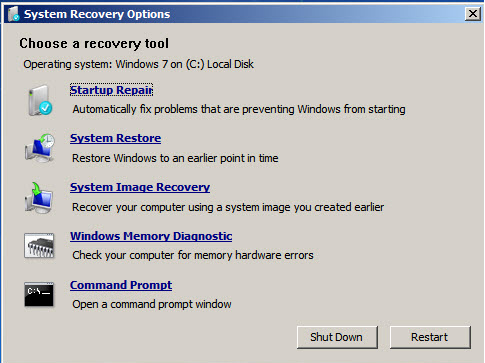
The Window that follows will then show all the System Recovery Options. Simply click on the one that you want to perform and you’re good to go!
How to Access System Recovery Options from the Hard Disk
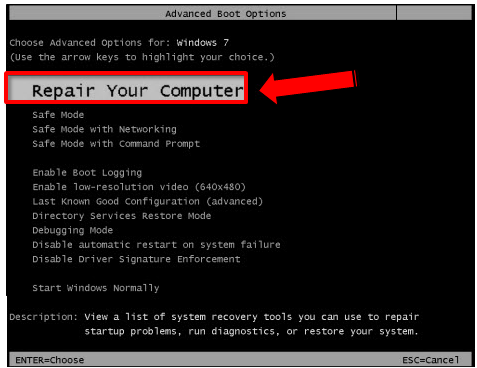
Upon installation, Windows 7 reserves 100MB of your hard drive space for the “System Recovery Options” so you can still access and use them even if you don’t have an installation disk. To use this, simply press the F8 key while your computer is starting up just before the BIOS information screen appears and afterwards, you should see the “Advanced Boot Options” screen. From here, you need to select “Repair Your Computer” using the arrow keys then press the “Enter Key” once it gets highlighted.
Next, a Window will appear labeled “System Recovery Options” which asks for the keyboard input method that you want. Simply select the one that you wish to use then click on the “Next” button.

The Window that follows will then ask for the “User name” and “Password” which you use to log on to Windows 7. Simply type these information and once you are done, click on the “OK” button.

Finally, you will arrive at the “System Recovery Options” menu where you can select the one that you want to use and initiate the system recovery/repair process.
Using any tool found on the “System Recovery Options” is a life-saver especially if you still need to save and backup important files before finally re-installing Windows 7. If you have questions or suggestions for any future topic to be covered on a tutorial, please feel free post then on the the comments section below so we can be informed of it and address them right away.