Working with the Tabs in File Explorer’s Main Window
Navigating within the File Explorer Window always starts in the “This PC” section. You will see this after you open the File Explorer Window itself and from here, you will need to get familiar with the tabs that are found just below the Quick Access Toolbar which we’ve talked about in our previous tutorial. Making the most out of the File Explorer tool means mastering all that has to do with it and this includes the ribbon based options which are found under the tabs that we are going to talk about in this article so be sure that you already know how to access the File Explorer Window (previously known as Windows Explorer) in your Windows 8.1 machine and in case you have no idea of how it is done because of the absence of the Start Menu, you can read some methods in accessing this very important tool from one of our previous tutorials for the “File Explorer” series.
From Windows Explorer to File Explorer
Loyal Windows users who switched from one Windows operating system version to another when a new one gets released surely won’t recognize File Explorer . This is because in these previous Windows versions, it used to be called Windows Explorer. The sudden change of name could be attributed to the addition of a new world that is merged perfectly with the Desktop environment which Microsoft calls the “Metro”.
Yes! Windows 8.1 is actually a combination of the very familiar desktop screen where you used to work with desktop programs and the newly integrated Metro environment where you can enjoy using mobile apps that instantly adds new features to your machine with easy mobile app installations. Now, you can enjoy playing your favorite mobile games on the bigger screen of your Windows 8 or Windows 8.1-based laptop or PC.
Accessing the File Explorer Window
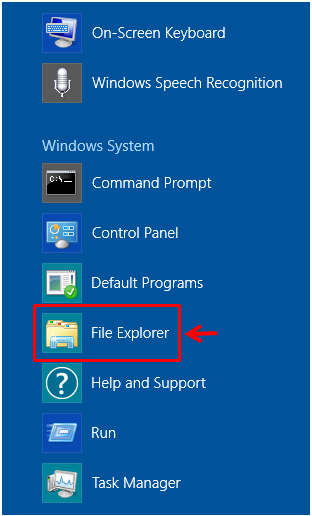
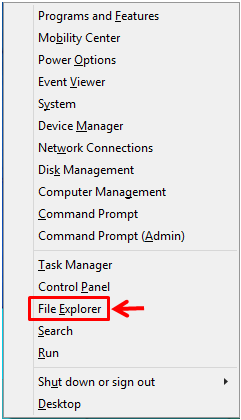
Now that you already learned what File Explorer really is, you’ll need to at least learn how you can access it so you can effectively manage the files that are saved in your Windows 8.1 machine. There are many ways in doing this but I will only show the easiest one here to save space. Just use the Windows+X keyboard shortcut combination to access s hidden menu that will appear at the bottom-left portion of the screen. From here, you should be able to see a link that says “File Explorer” which when clicked or tapped would open the File Explorer Window.
When the File Explorer Window opens, you will notice that the Window is labeled as “This PC” and on its contents pane, you should be able to see some of the main folders and libraries as well as drives that exists on your Windows 8.1 machine. At the top-left portion of this Window, you will see three horizontal bars lying one on top of the other. The top-most bar is called the “Quick Access Toolbar” which contains some icons that you can easily click to do some tasks such as creating a new folder, burning a disk, undoing an action or even executing some actions for a Window such as maximize, minimize etc. To learn more of how this section works, you can read our tutorial that explains everything about the “Quick Access Toolbar” in File Explorer’s main Window.
The File Tab
Just below the Quick Access Toolbar is another horizontal bar that contains some tabs. Each of these tabs have a unique set of options under them and before we go to the options that are available when you start using File Explorer in getting into different places within the Windows 8.1 system, it would be very useful if we first explore all the options which are found in the main Window itself. First one is the File tab which when clicked would show its own set of options right inside a box as shown on the screenshot below.
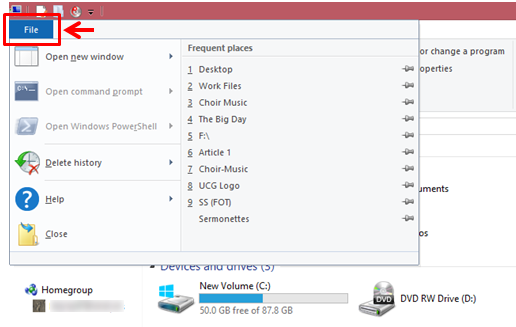
The options which are available actually has to do with files and how you can effectively work with them. For instance, you can choose to open folders in a new Window, view your history of deleted files and other advance ones such as “Command Prompt” and “Open Windows in PowerShell”.
The Computer Tab
Next to the File tab is another one that is labeled “Computer” and when you click on it, you’ll be able to access another set of options that will appear on the third horizontal bar which is located just below it. These options are also grouped into three categories which are labeled as “Location”, “Network” and “System”. If you want to see the properties of a selected folder, you will need to click on the “Properties” button that is under the “Location” category. There are also buttons for opening and renaming a file or folder that is located in this same options group.

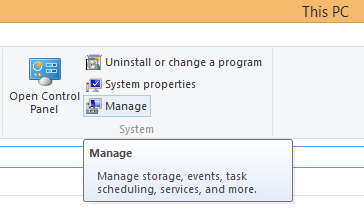
Next, you will see another group of options still under the “Computer” category which is labeled “Network”. Under this options category, you will find some setting s and tweaks that you can do to your machine in case it is connected to a server or a network that provides access to files and other stuff that are enabled for sharing. Next to it is the “System” options category and from here, you will be able to access the “Control Panel” Window, uninstall a program easily, view your system’s properties and manage your computer’s tasks, events, storage and other stuff. If you want to know what each button does, all you need to do is point to it and a box will appear briefly explaining what it is used for.
The View Tab
Lastly, you will find another tab that is labeled “View” and under it are options that are grouped according to “Panes”, “Layout”, “Current view” and “Show/hide”. The “Panes” options group allows you to make changes with how everything appears in the File Explorer’s main Window. For instance, you can make the “Preview” pane or the “Details” pane appear at the right edge of the screen simply by clicking on the options that correspond to each one of them.

The screenshot above shows the location of the “View” tab and as you can see, I have already made the “Details pane” appear which is highlighted at the right hand portion. Once you click on any of then items that are available on the “Contents pane”, the details of the selected folder will appear on this same right hand portion. To remove the “Details pane”, all you need to do is click on its button again found at the top.
The next set of options are quite easy to comprehend. Under the “Layout” options category, you will see some options for changing how items appear on the contents pane. Right next to it under the “Current view” section shows options for doing even more tweaks to how icons are arranged and lastly under “Show/hide” are small checkboxes for hiding or displaying some information such as item checkboxes, file name extensions, and hidden items.
Just go on and explore what each of these options do to the contents of File Explorer’s main page and who knows you’ll need that specific knowledge or tweak that you’ve learned in any future situation while you are working with your Windows 8.1 machine!